Featured:
What are the Different Ways I can Number My Sheets?
• Renumbering Your Sheets
• Batch Editing Sheet Numbers
• Define Multiple Custom Regions/Targeted OCR
• Renumbering Sheets from List View
• Renumbering Sheets from Sheet View
Rotating Sheets
Changing the Order of Your Sheets
Help! My Sheets Were Numbered Incorrectly
What Are the Different Ways I can Number My Sheets?
When you upload sheets to plangrid.com, there are different ways they can be numbered. Learn more here.
1. Auto-Detect: Our system will automatically detect the sheet number from the title block on your sheets when you upload your drawings.
2. Set a Region: You will draw a box over your preferred section for our system to read to define custom regions.
3. Use File Name: We will number your sheet by its file name on your computer.
4. Number Sheets Sequentially: We will number your sheets numerically, based on the order they were uploaded to PlanGrid.
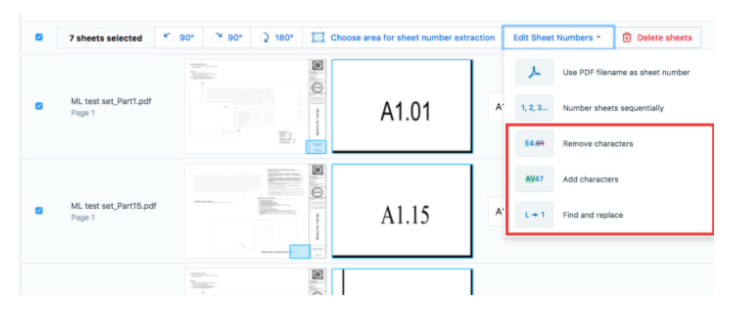
5. Remove characters, Add characters and Find and Replace: Use the "remove characters", "add characters", or "find and replace" tools to fix the sheet numbers of your selected sheets.
Renumbering Your Sheets
If your sheets were numbered incorrectly, or the sheet numbers need to be changed for any reason, you can easily make those changes through the PlanGrid website at https://app.plangrid.com.
Please Note: Only Project Admins can upload and edit sheet numbers. The new numbers for the sheets are immediately put into effect for the project and will be changed for all tablet users the next time their project information syncs with PlanGrid.
Batch Editing Sheet Numbers
To renumber all sheets in your upload group before publishing:
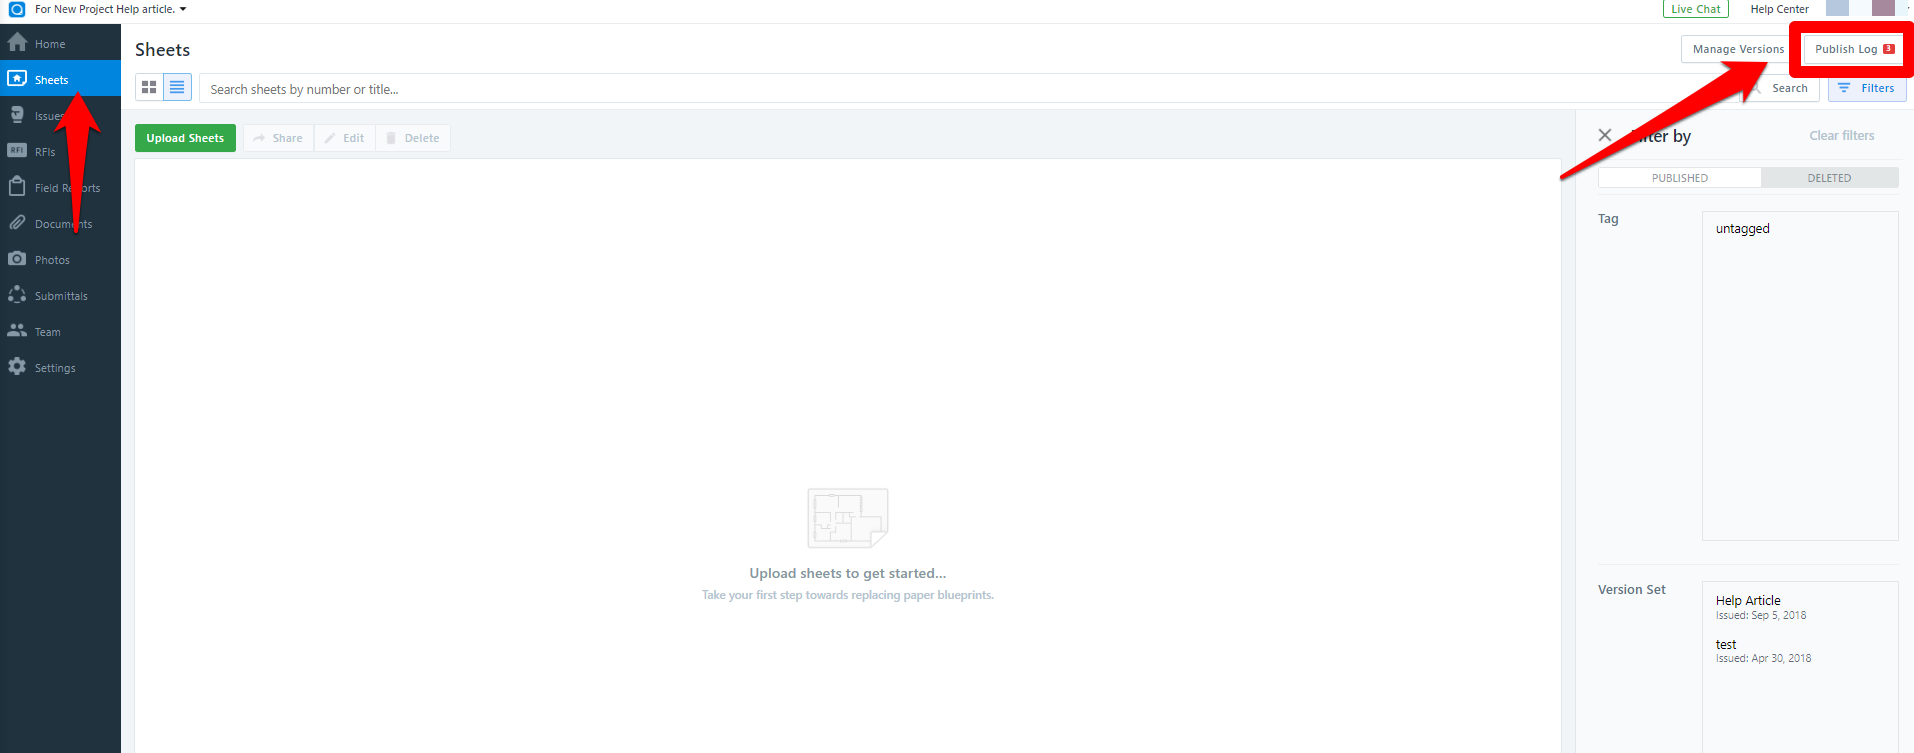
1. After uploading sheets, open your Publish Log and click on your 'Publish your Sheets'.

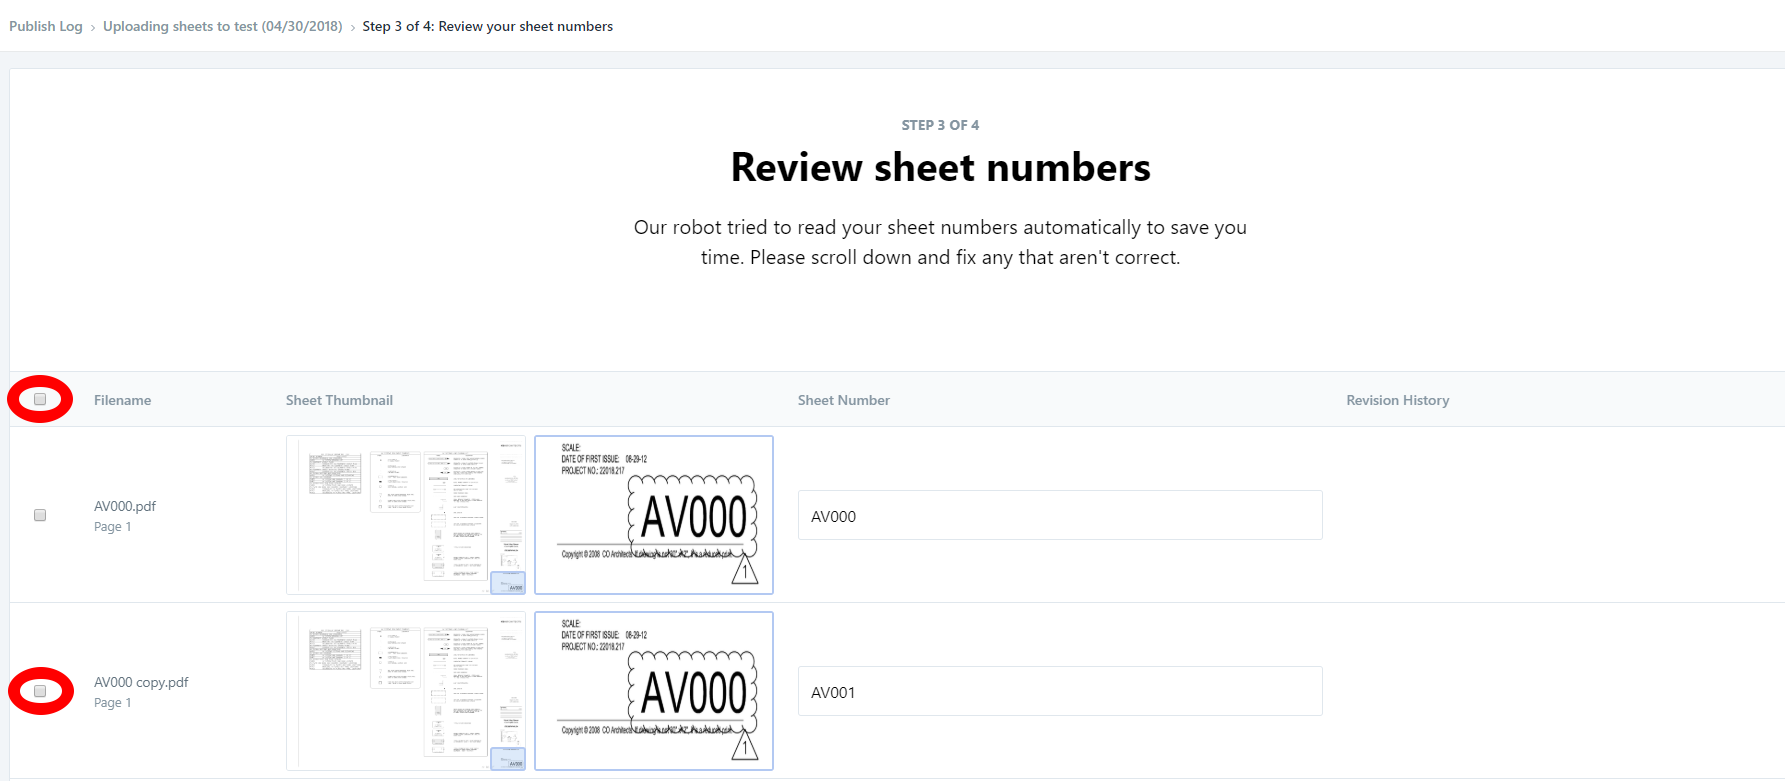
2. From the Publish log, to select multiple sheets, click the selection checkboxes on the left side of the list. If you want to select all sheets, click the checkbox in the grey header row.
If you click on one checkbox then hold down the Shift key and select a second checkbox it will automatically select all the the checkboxes that are between the two checkboxes.
Define Multiple Custom Regions / Targeted OCR
Now you can tell our OCR where to look for your sheet numbers and sheet titles on your sheets! If your sheets weren’t correctly named when you uploaded them, or you don't have an index sheet for your sheet descriptions/titles, you can manually select the location from where you would like us to pull them.
1. Select the sheets you want to edit (as shown above)
Select sheets using the checkboxes on the left-hand side of the table.
2. Click on "Choose Area For Sheet Extraction"
You can choose an area to extract text on both the sheet number and sheet title pages. The button will be labeled "Choose area for sheet number extraction" or "Choose area for sheet title extraction," depending on the step you are at. You will only see the button in the header row once you select at least one sheet.

3. Draw a box around the sheet number or sheet title area on sheet
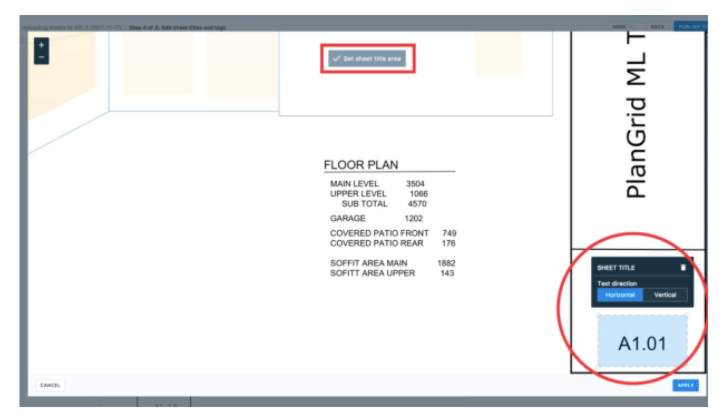
A window will come up and you will see a view of the first sheet in the set; zoom in or out until you can see the sheet number or title. Click the "Set sheet number area" or "Set sheet title area" button at the top and with your mouse, draw a box around the area of the sheet where the sheet number or title appear. Make sure that the correct text direction, horizontal or vertical is selected, then click 'Apply'.
4. Review your results and repeat the process for the sheets with a different number or title location.
After a few seconds, you'll see the sheet number or title that has been extracted based on the area you selected; scroll down the list to ensure that these are correct for the sheets that you edited.
If there are sheets with title boxes in a different location, repeat the process with those sheets. Please refer to the Gif image below for further detail.
Please Note:
- Please keep in mind that since your sheets are being reprocessed, you will experience additional process time. Depending on the number of sheets in your upload, this could take several minutes.
- Your selection applies to all sheets that you've checked off. If they have different styles of title boxes or varying lengths of text, one box may not fit them all.
- If there is extraneous text in the box, we might pick that up.
- If your box intersects a line in the title box, we may recognize that as an I or L.
How to fix sheet numbers
1. Select the sheets you want to edit
Select sheets using the checkboxes on the left-hand side of the table.
2. Try defining regions to look for sheet numbers and title
If you have not already, try defining the region on your sheets where the sheet number and titles appear so our OCR has a better guidance around where to find these elements. If this doesn’t work, proceed to Step 3.
3. Click on the "Edit sheet numbers" or "Edit sheet titles" button
The button will be labeled "Edit sheet numbers" or "Edit sheet titles", depending which step of the process you're on. This button will be visible in the header row once you select at least one sheet to edit.

4. Use the "remove characters", "add characters", or "find and replace" tools to fix the sheet numbers of your selected sheets.
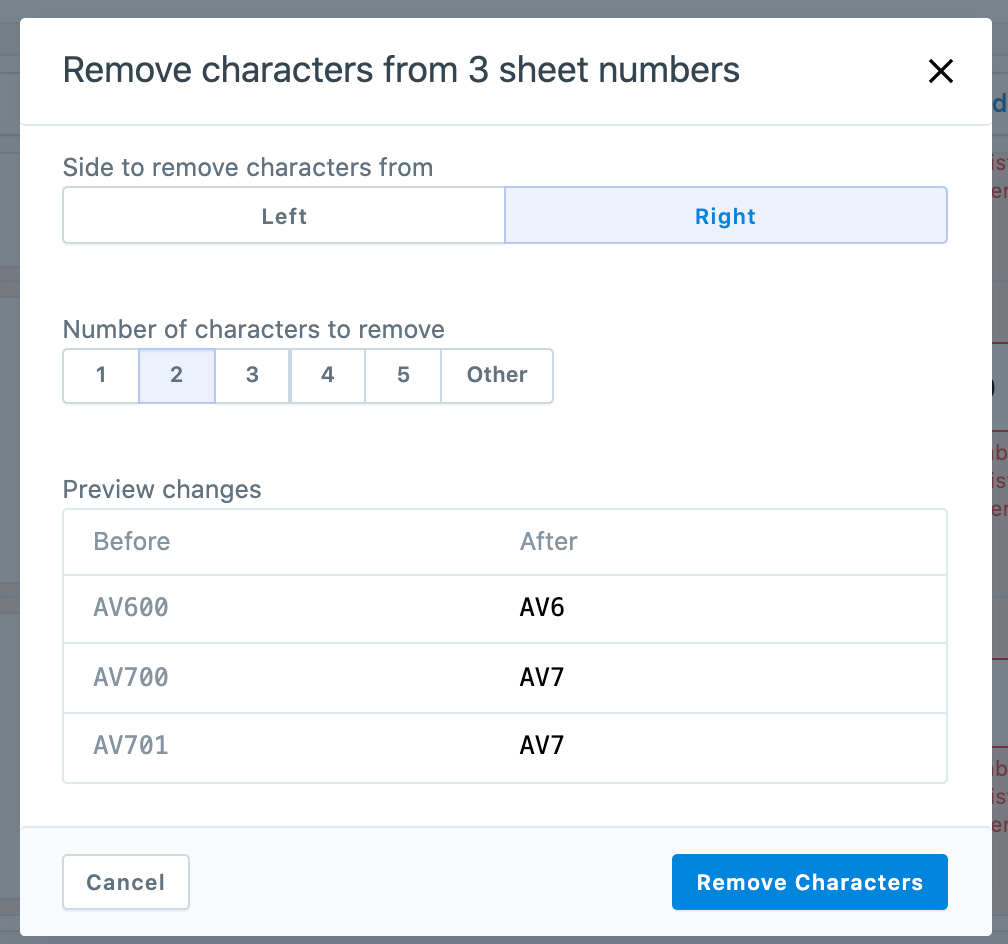
Remove characters: The remove characters tool allows you to remove a number of characters from the front or back of your sheet number or title. Once you select "Remove characters" from the drop down menu, you will be able to select whether you want to remove characters from the left or right and how many characters. Once you've done that you can see a preview of the changes below and if you are happy with them, click on "REMOVE CHARACTERS" to apply the changes.
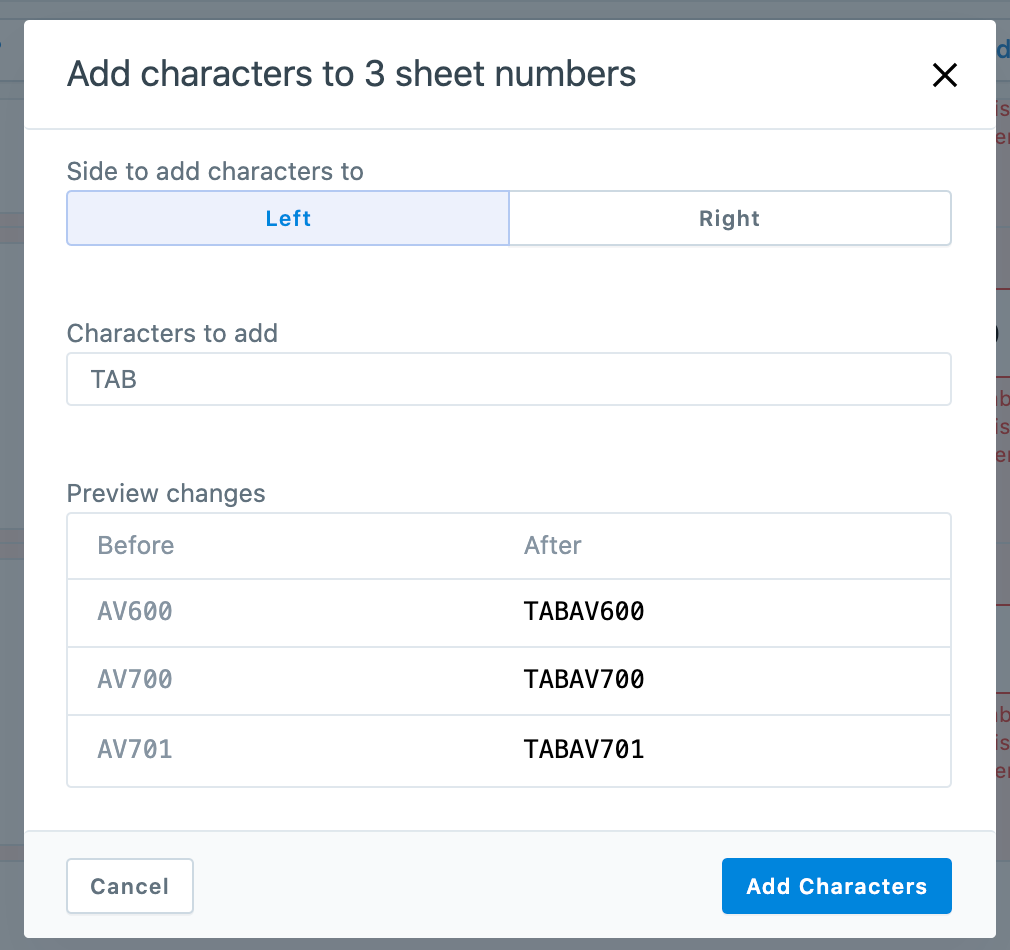
Add characters: The add characters tool allows you to add characters to the front or back of your sheet number or title. Once you select "Add characters" from the drop down menu, you will be able to select whether you want to add characters from the left or right and which characters you'd like to add. Once you are done you will see a preview of the changes below and if you are happy with them, click on "ADD CHARACTERS" to apply the changes.
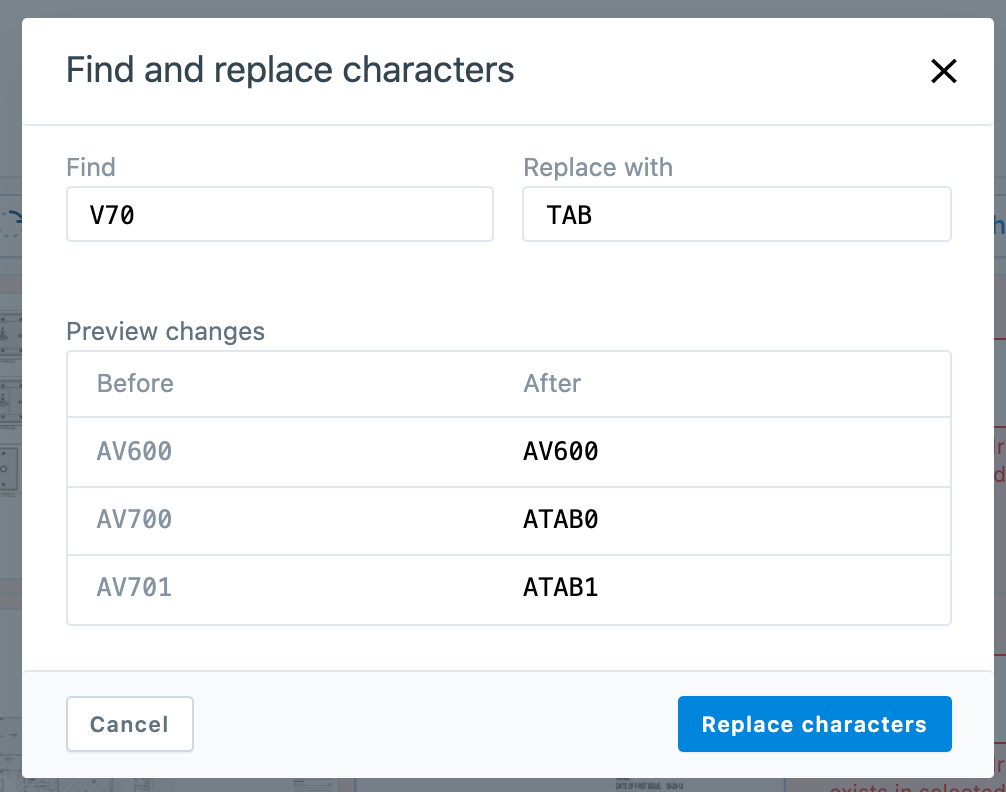
The find and replace tool allows you to replace characters. Once you select "Find and replace" from the drop down menu, you will be able to enter the character(s) you want to find and the character(s) you'd like to replace it with. Once you've done that you can see a preview of the changes below and if you are happy with them, click on "REPLACE CHARACTERS" to apply the changes.
Once all the sheet numbers are correct - click on the blue button at the bottom of the page 'Sheet Numbers are Correct.'

Some sheets will contain a suffix or prefix in the title block which may not be included in the sheet number when referenced in detail callouts, causing the callouts to not hyperlink automatically. To remedy this, use our batch editing feature to remove the prefix or suffix before publishing, which will allow PlanGrid to correctly hyperlink your callouts.
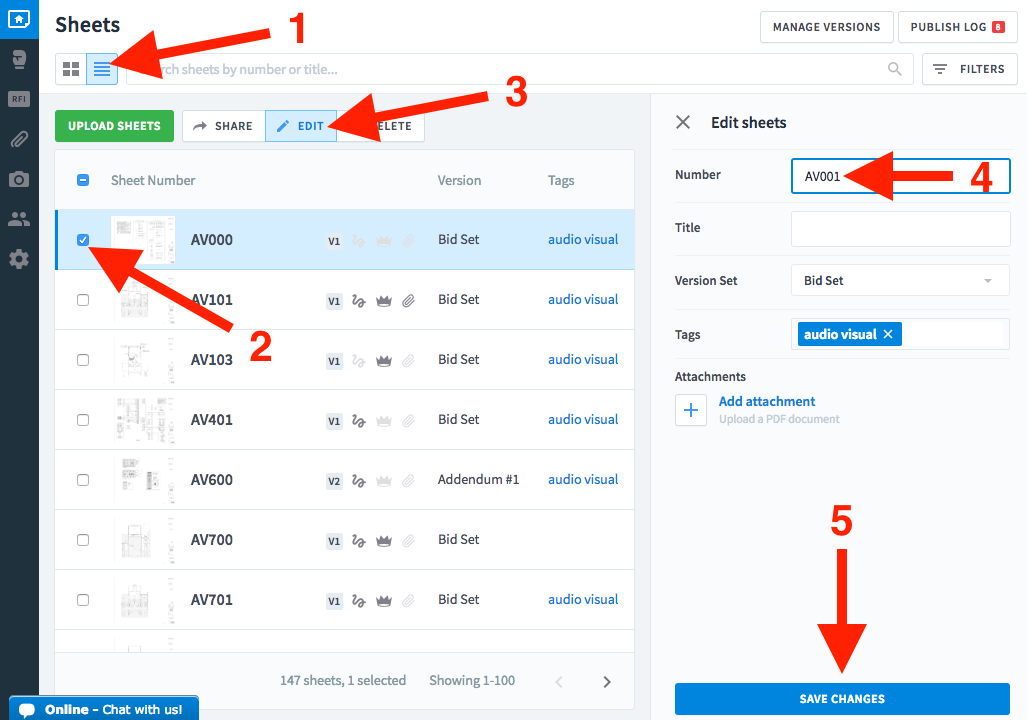
Renumbering Sheets from List View
1. Click on the List View button in the sheets icon.
2. Then, click on the checkbox to the far left of the sheet number you'd like to edit.
3. Click on the "Edit" button at the top.
4. In the Edit Sheets window, edit the sheet number
5. Click Save Changes.
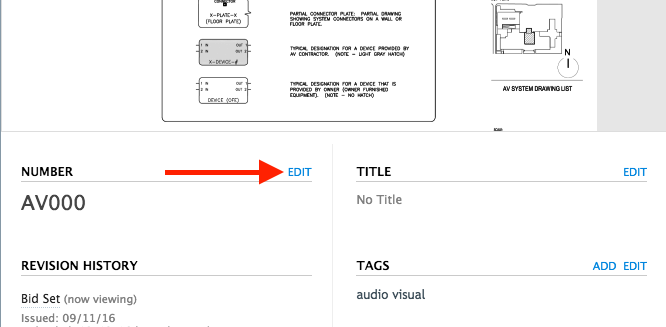
Renumbering Sheets from Sheet View
When viewing any sheet on the web, scroll below the sheet viewer, and click on the “Edit” link in the upper right corner of the number field.
Rotating Sheets
If you uploaded your sheets and noticed they were oriented incorrectly, you should delete and re-upload them before doing anything else. When you re-upload them, you can rotate them in staging.
1. Select the sheets you want to edit by ticking the boxes to the left of the sheets
2. Click on the rotate or delete buttons
Notice that once you have selected at least one sheet, you'll see the buttons that will allow you to rotate your sheet(s) by 90 degrees clockwise or counter-clockwise and 180 degrees. You will also see a button that allows you to delete the selected sheet(s).

Changing the Order of Your Sheets
PlanGrid sheet ordering relies on discipline prefixes in your sheet numbers. Disciplines represent the first alphabetical characters of a sheet number (or the number zero, which is currently the only numerical character that can be defined as a discipline). Project admins will create their preferred discipline prefixes (based on their sheet numbers) and define the ordering of these disciplines in the sheet order management page on web.

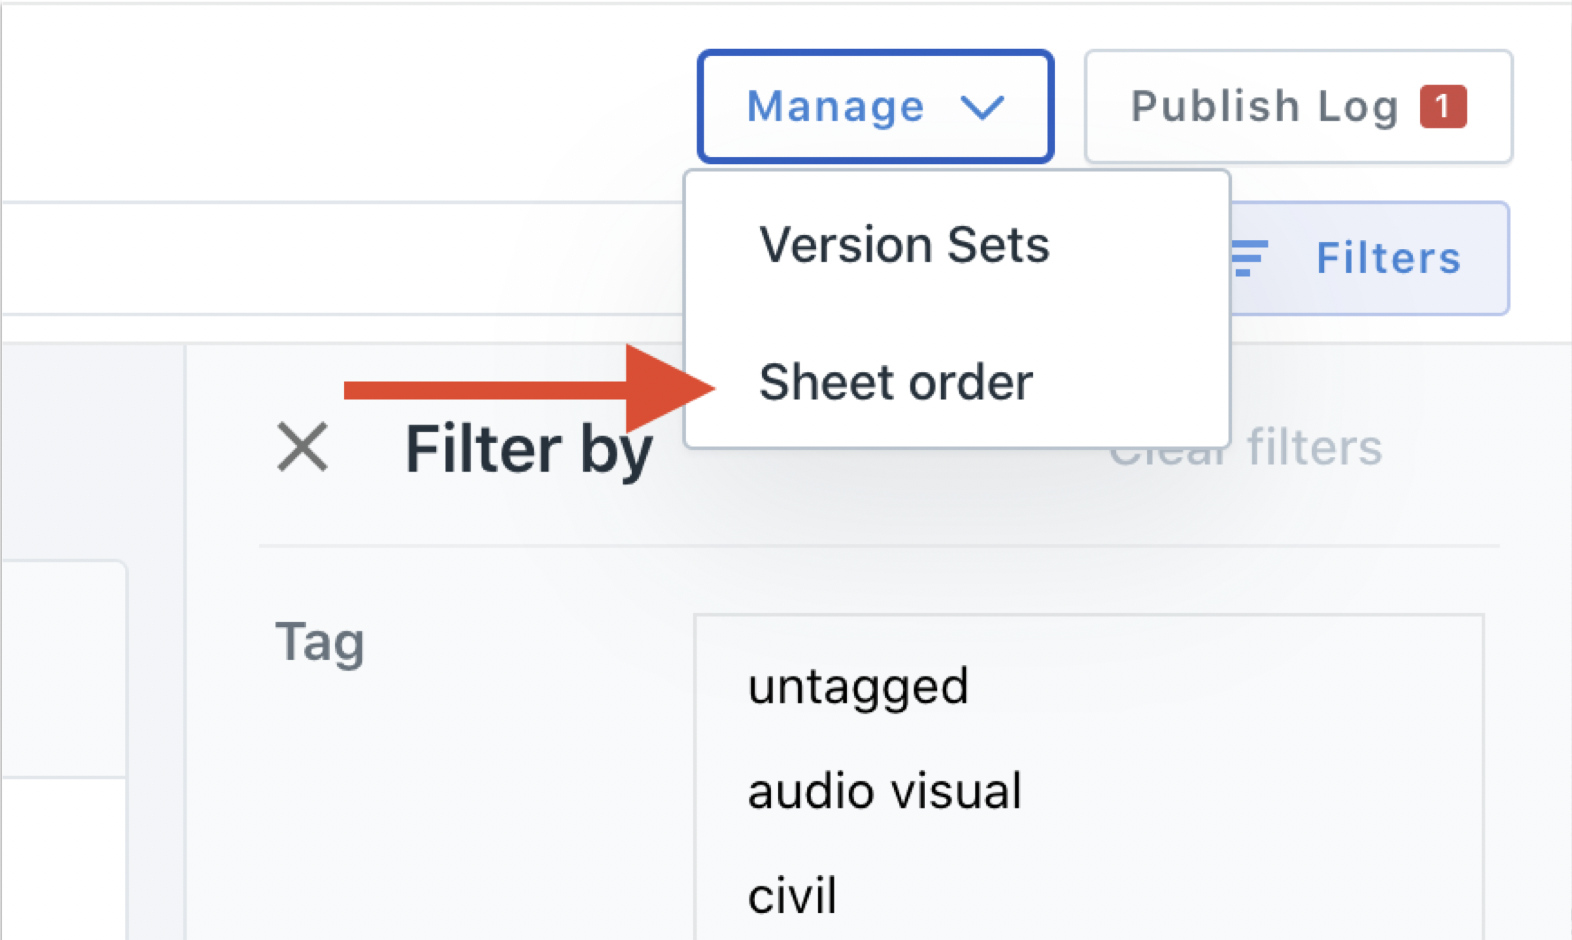
Project administrators will see a “Manage” dropdown list, where they can choose to either navigate to the version sets management page, or the sheet order management page.
On upload of new sheets to a new project, PlanGrid will automatically define a prefix order based on the order of the sheets uploaded. Project admins can then navigate to the management page to refine or adjust the ordering before choosing to save and apply.
For existing projects, the admin can go into the Mange > Sheet order to see the suggested order then save and apply that or rearrange/add/remove disciplines before choosing to save and apply to re-order the sheets.
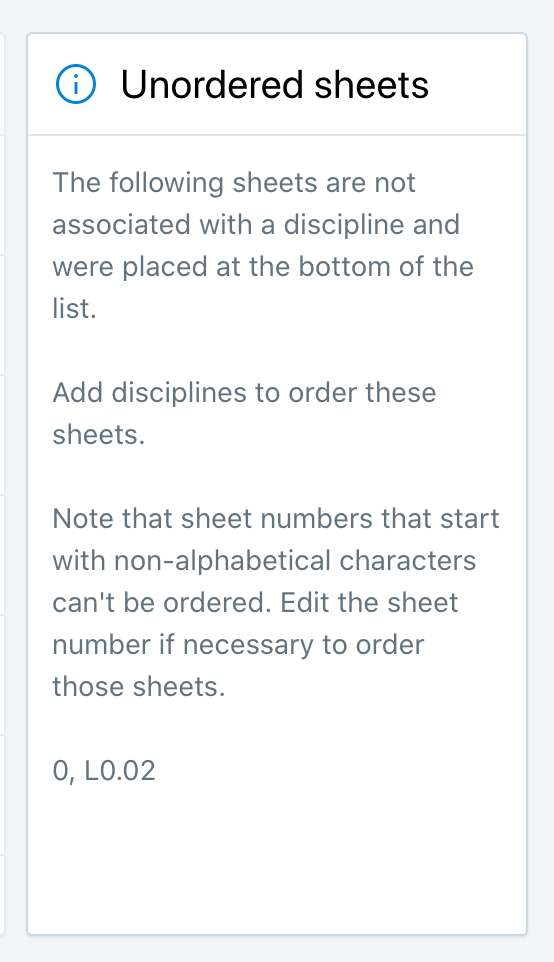
Any sheets that do not have a prefix will move to the bottom of the sorted list, and be defaulted back to an alpha-numeric sort order. When you are in the “manage > sheet order” section, there will be an indication showing that sheets are not part of an existing discipline . Sheets that do not start with a letter prefix or the number zero cannot be ordered.
For more information on sheet ordering, see Sheet Sort FAQ
Help! My Sheets Were Numbered Incorrectly!
Q: Is there anything that I can do to help the GridBot OCR correctly and/or more quickly number my sheets?
A: Yes. Grid-Bot OCR will perform the best if you follow these guidelines:
- Use a standard font (e.g. Arial, Courier, Helvetica) with continuous, filled-in bold characters. Avoid italics, stencil or handwriting-like fonts.
- Provide white space between each character.
- Use a large font, and place it closest to the bottom right corner.
- Try not to write or draw anything on top of or right next to the sheet number
- Label the drawing number appropriately
- Provide an appropriate image quality: 150 DPI or higher, without significant compression artifacts.
- Use a TrueType font.
- Do not alter the text from the original font, such as changing width (must be 1.0) or other style options.
- Make sure the Z coordinate value of the text is zero.
You can also refer to this document published by the AIA that discusses the best practices for organizing construction documents.
Please note: If our system is unable to read your sheet number, it may also have trouble hyperlinking your detail callouts. For information on missing detail callouts, go here.
If your sheets have been numbered incorrectly but they meet most or all of the style guidelines, please click the blue “?” In the lower left and type your question to see solutions and contact support if needed.
We understand that these drawing decisions may be out of your control, which is why we are actively working to improve the GridBot OCR to handle nearly any drawing. Even after the improvements, following these guidelines will reduce the time between upload and when you can view your drawings.
Ideal:
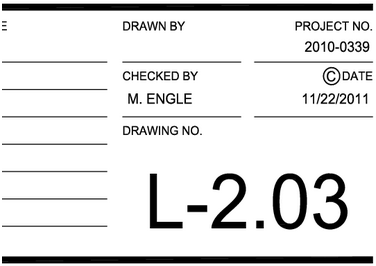
Sheet number written in large text with adequate space, in a standard font, close to bottom right corner.
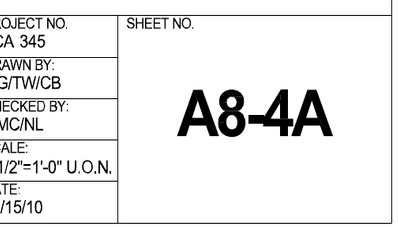
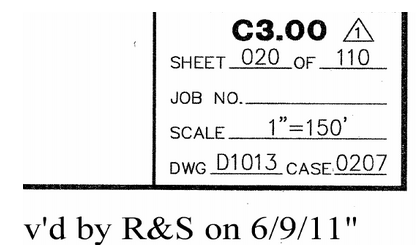
Non-ideal:
Issue above: No white space between the dash and the four.
Issue above: Sheet number further from bottom right corner.
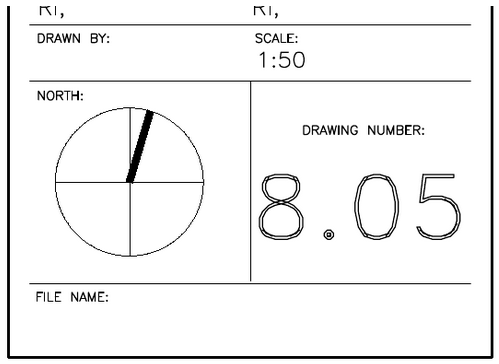
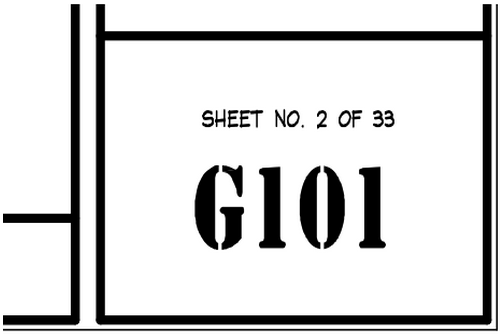
Issue above: Sheet number written in a hollow font.
Issue above: Sheet number written in non-standard and not continuous font.
Related Articles:
- My Detail Callouts
- List View
- Troubleshooting FAQ
- Publishing My Sheets
- Sheet Slip-Ins: Sheet/Version Management