Featured:
Adding Photos and Videos to your project
• Web
• iOS
• Android
Uploading and Viewing 360 Photos
Viewing, Editing, Exporting, and Deleting
• Web
• iOS
• Android
• Windows
Photos: With Photos in PlanGrid, you can store and manage all media related to your project. This is useful for everything from documenting progress photos to informal communication and material tracking. Photos supports numerous file types in different formats.
360 Photos: Photos supports 360 photos in JPG format. Use any device to capture 360 photos and upload them directly to PlanGrid. 360 photos are viewable on Windows, Android, and iOS in both touch view and motion view.
Videos: You can now upload and record videos within PlanGrid as an MP4 file type, and up to the size of 1GB. With our Videos capability, you can record videos up to 2 minutes on any sheet. Any newly recorded videos will retain it’s GPS data, if available. Additionally, you can place them as a reference in our Tasks, Advanced RFIs, and Field Reports.
- Images
- PNG (20MB limit)
- JPG (20MB limit)
- WEBP (20MB limit)
- Videos
- MP4 (1GB limit)
The Photos feature allows you to upload media from any device, either one at a time or in bulk. You can add files to markups and tasks, and you can attach existing photos and videos to RFIs. You're also able to filter media to find what you're looking for more easily, as well as download the files or export a report about them.
Adding Photos and Videos to your project
Photos
Navigate to your Photos page and click “Add Media.” Drag and drop your file(s) to the upload screen or click “From your computer.” Then click “Done.”

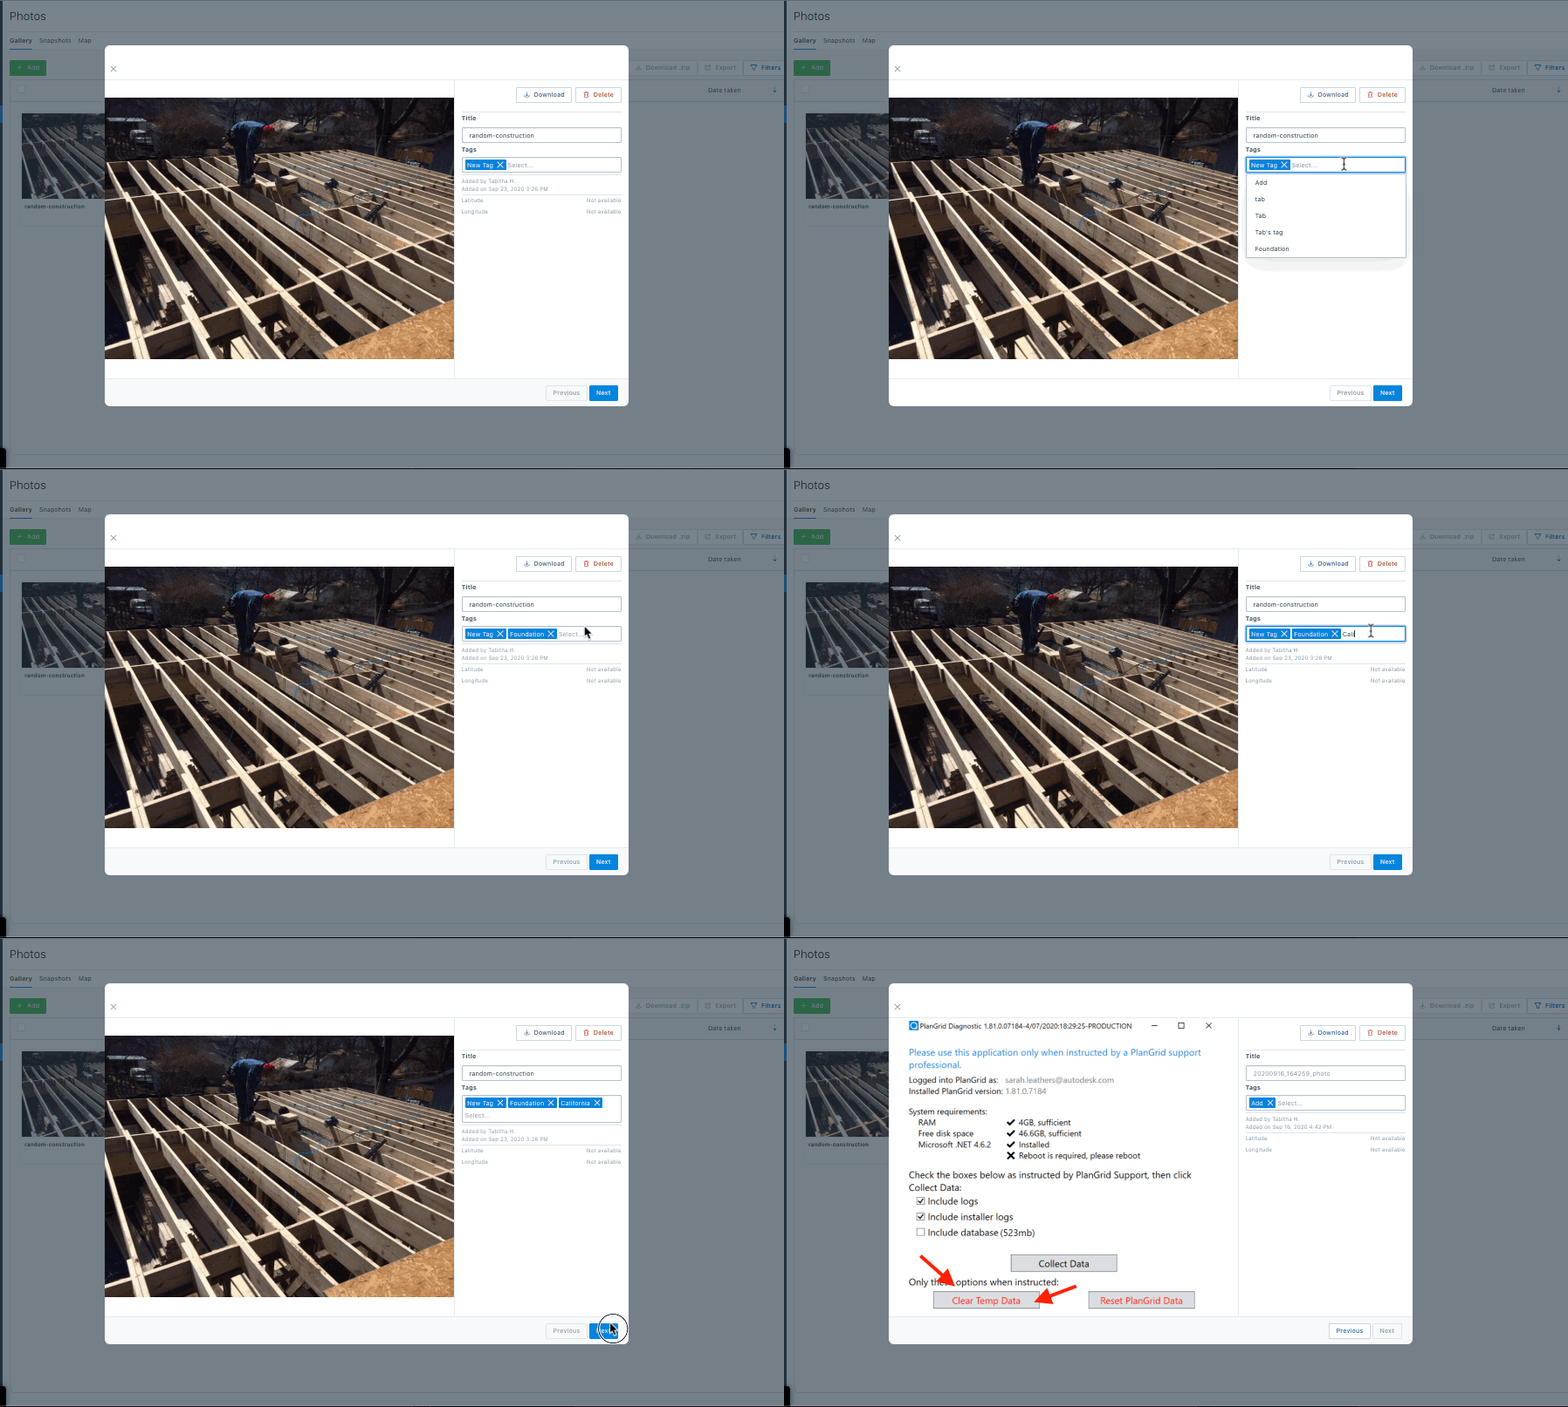
Once you have uploaded a photo, you will be able to open the photo and add a tag. You can choose to either add an existing tag or create a new one; more than one tag may be added at a time. Use the “enter” or “return” button to save the selected tag(s) to your photo.
Sheets
To add a photo or video directly to a sheet, open the sheet and click the camera icon on the markups toolbar. Then select “Add Photo,” upload your file(s), and click “Finish.”

Tasks
You can add a photo or video to a task either directly from a sheet or from the tasks list view.
From a sheet, select a task or create a new one. Locate the “Photos” section of the task and click “Add Photo,” upload your file(s), and click “Finish.”
You can also add a photo to an existing task from the task list view. Select an existing task and locate its “Photos” section. Click “Add Photo,” upload your file(s), and click “Finish.”

Photos
Navigate to your Photos screen and tap “Add Media.” You can take a new photo or video or select one from your camera roll. Choose the option you would like and allow PlanGrid to access your camera or camera roll if necessary.
Once you’ve taken a photo or video or selected the file(s) you’d like to add, and they’ll be added to the gallery.

Sheets
To add a photo or video directly to a sheet, open the sheet and tap the camera icon on the markups toolbar. You can choose to take a new photo, select one from your library, or take a new video. Once you’ve selected an option, you can publish your photo or video as a markup to the sheet.

Tasks
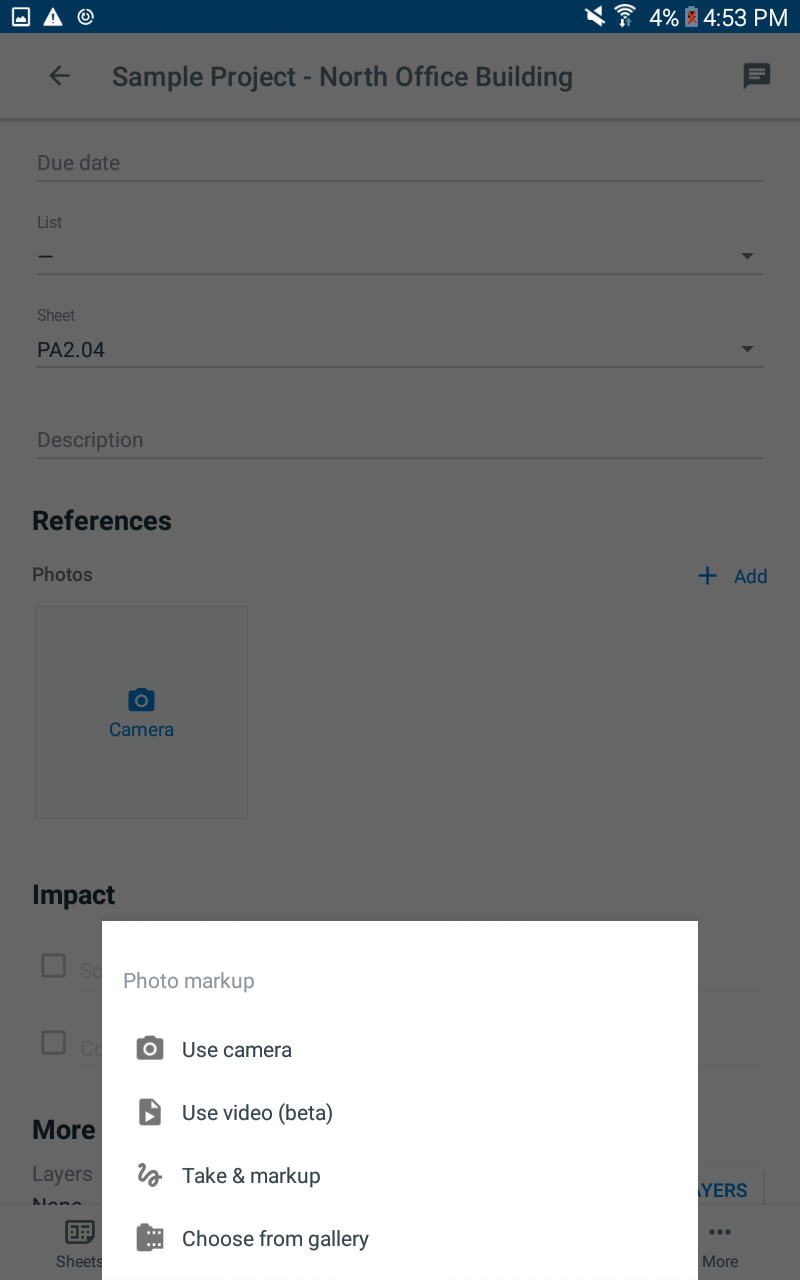
You can add a photo or video to a task either directly on a sheet or from the task list. Select the task or create a new one, and locate the “References” section of the task-creation screen. Tap “Add photo” and choose to take a new photo, select one from your library, or take a new video.

NOTE: Uploading photos via the PlanGrid iOS app will compress photos.
Photos
In the PlanGrid app, navigate to your Photos screen and tap the “Add” icon. You can take a new photo or video or select from your device’s gallery.
Once you’ve taken a photo or video or selected the file(s) you’d like to add, tap “Open.”

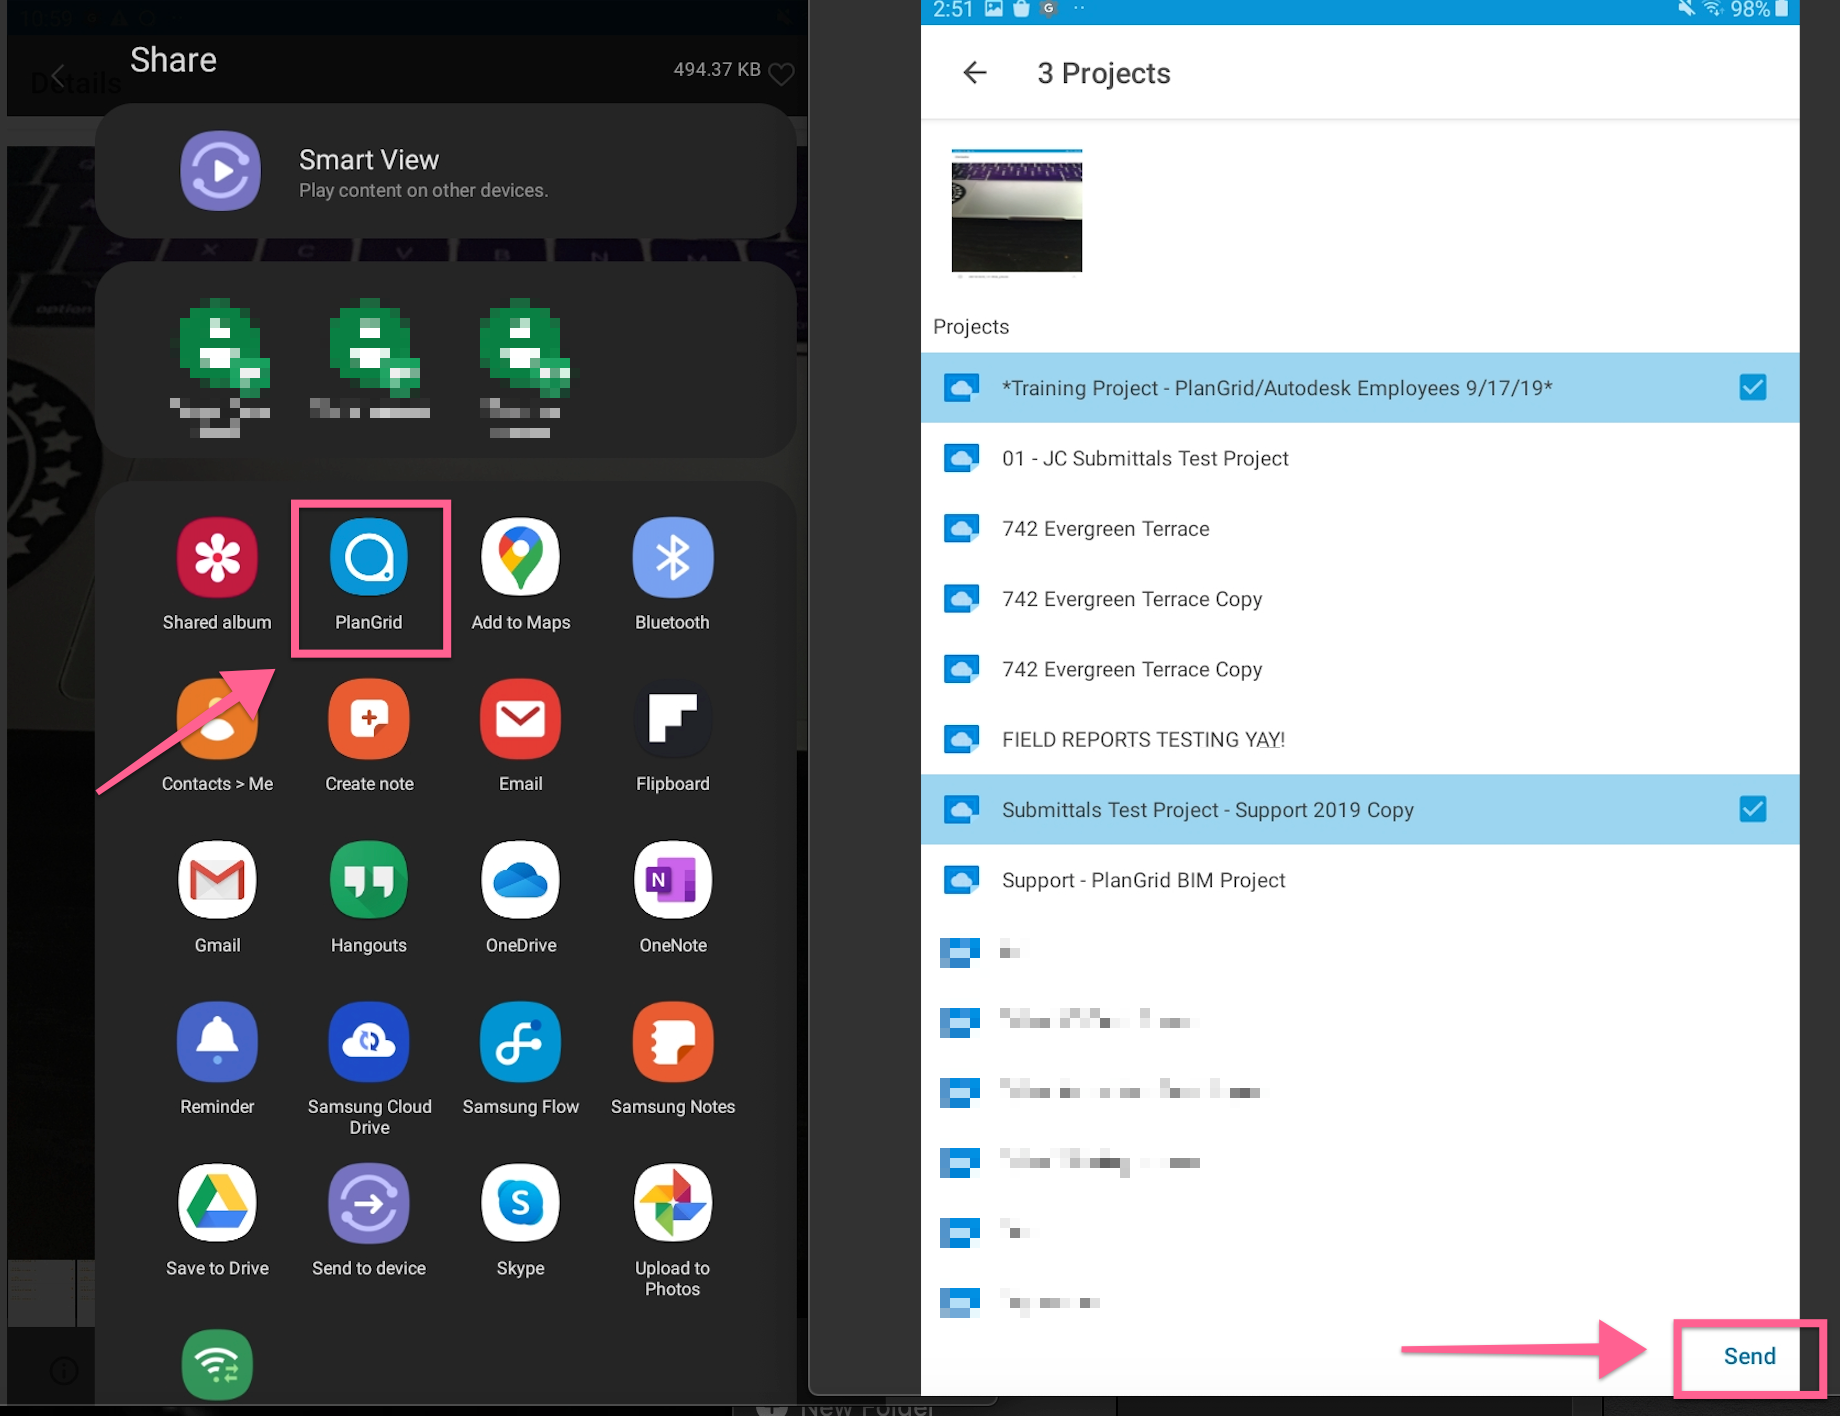
You can also add photos directly from your Android device's Gallery into projects on the PlanGrid app. Open the Gallery on your Android device and select the file(s) then tap the Share icon.
Select the PlanGrid app (you may need to allow access if this is the first time you have used this function).
Tap the name of the project(s) you wish to upload the chosen files to and then tap "Send" in the bottom right. Photos will now be visible in the Photos tab of all selected projects.
Sheets
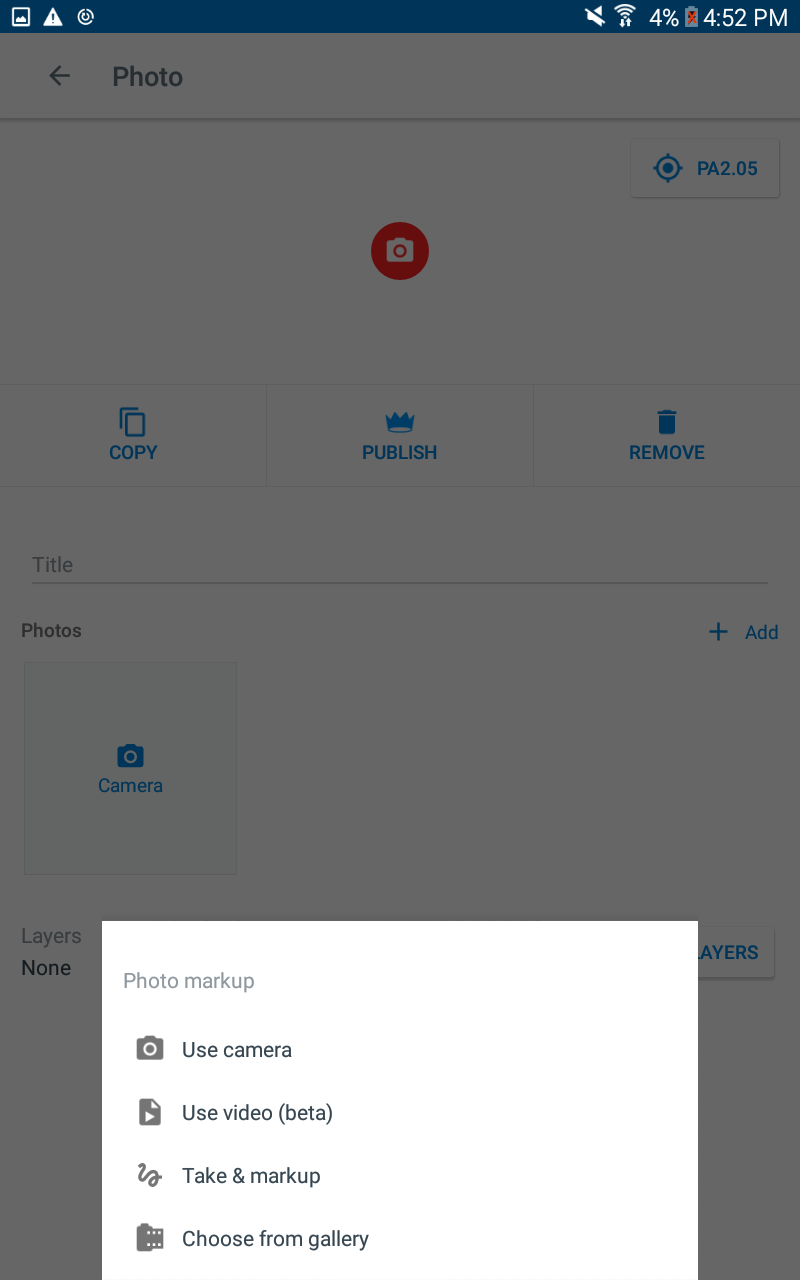
To add a photo or video directly to a sheet, open the sheet and tap the camera icon on the markups toolbar. You can take a new photo or video or click “Add” to select one from your device’s camera gallery. Once you’ve selected an option, you can publish your photo or video as a markup to the sheet.
Tasks
You can add a photo or video to a task either directly on a sheet or from the task list. Select the task or create a new one, and locate the “References” section of the task-creation screen. You can take a new photo or video or click “Add” to select one from your device’s camera gallery.
On Windows
Photos
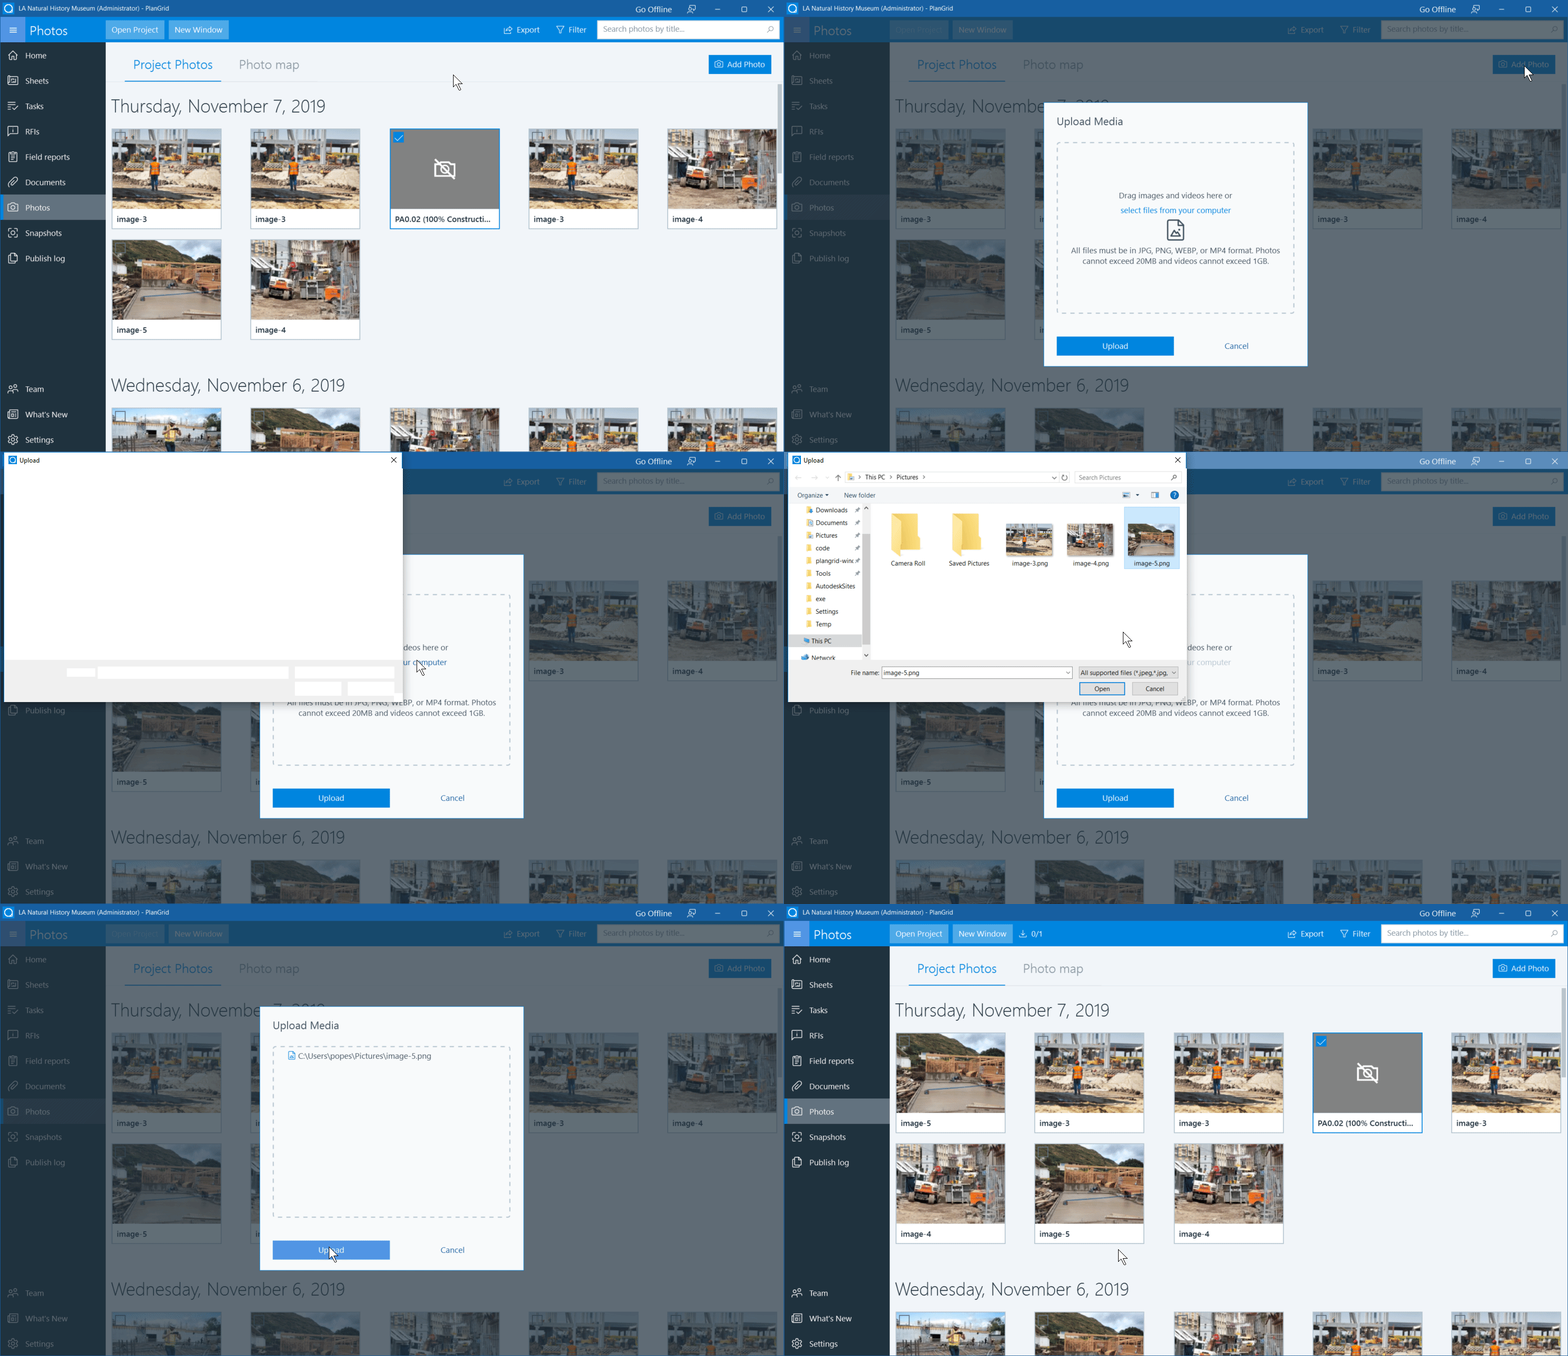
Navigate to your Photos page and tap “Add Photo.” Drag and drop your file(s) to the upload screen or click “select files from your computer” and click “Upload.”
Sheets
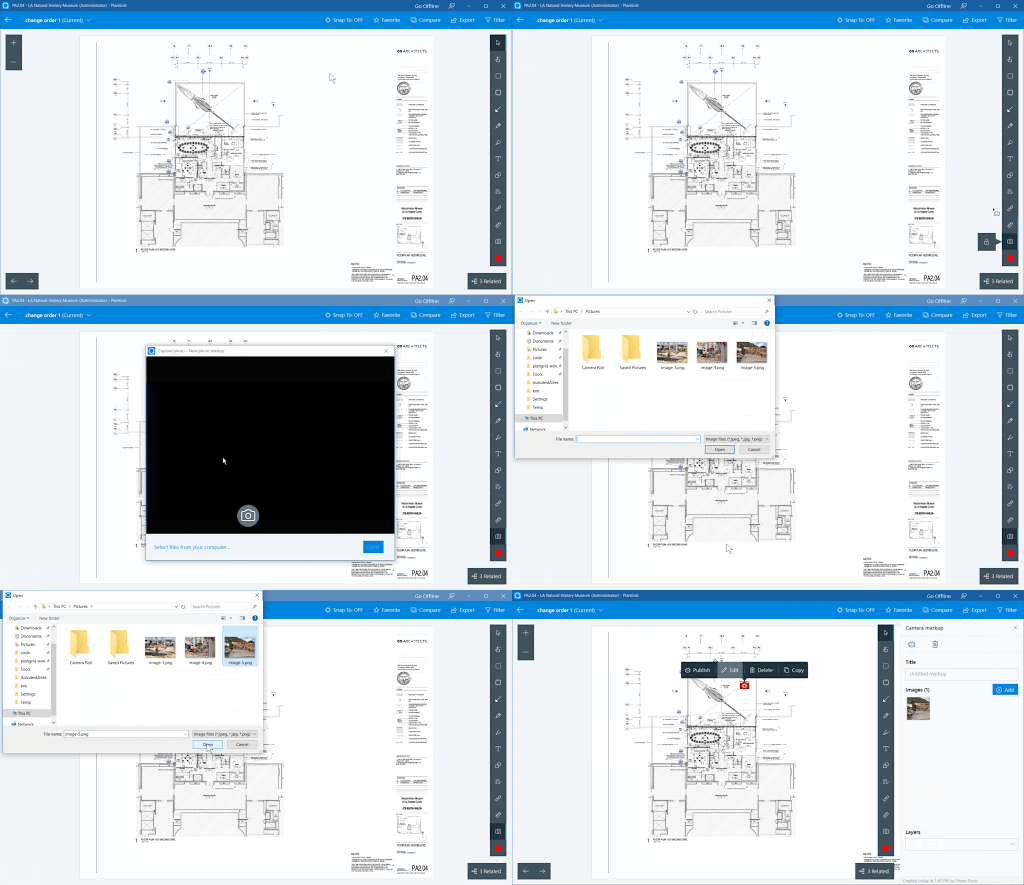
To add a photo or video directly to a sheet, open the sheet and click the camera icon on the markups toolbar. You can take a new photo or video or click “Select files from your computer” to select from your device’s camera gallery.
Tasks
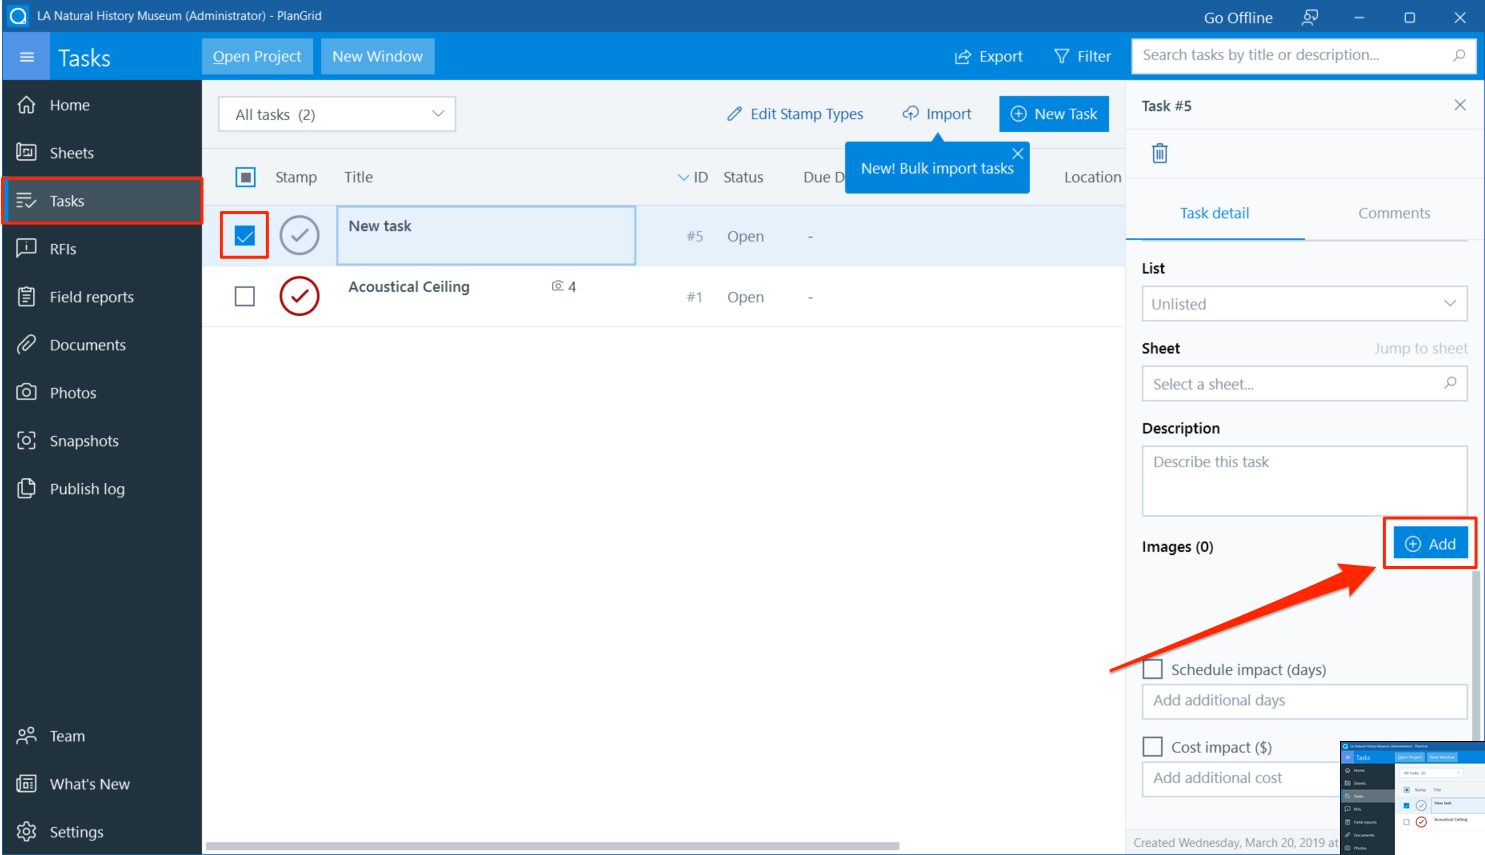
You can add a photo or video to a task either directly on a sheet or from the task list. Select the task or create a new one, and locate the “Images” section of the task-creation screen. Click “Add” and you’ll have the option to take a new photo or video or upload from your device. If you choose to upload from your device, you can select multiple files
Uploading and Viewing 360 Photos
PlanGrid supports 360 photos in JPG format. Take a 360 photo with any device and upload it to PlanGrid as you would a normal photo, either from the Photos page or directly from a sheet or task.
Your 360 photos are viewable on Windows, Android, or iOS devices. You can navigate them using either touch view or motion view.
Viewing, Editing, Exporting, and Deleting
When viewing photos from your Photo Gallery, you will notice a watermark in the upper right of the thumbnail to differentiate between photo object types. If a thumbnail has not yet downloaded, a circular progress bar will replace the watermark. Photos or unknown media will have no watermark. Videos will show the length if available, and triangle Play button if not available. The 360 Photos will have their own watermark image. These will also appear in web-generated reports (task reports, photo reports, etc) but will not appear in locally generated Photo reports (sheet-based reports on Windows and iOS).
Photos that were added as part of RFIs or field reports will show in the gallery by default.

On Web
On web, you can view photos and videos, see details about them, view them on a map, export, download, and delete.
Navigate to the Photos section of the PlanGrid website. From here, you can see details about each photo and video as well as download, export, or delete it.
Simply click on a photo or video to view details about it. You can change the title, see its location on a map, or download it directly from this view. You can also navigate between files using the “Previous photo” and “Next photo” buttons. If you’d like to delete the file, click “Delete.”

You can also interact with multiple photos and videos at once. To select every photo and video currently loaded, check the box on the upper-left hand side of the page. Or you can select multiple files by checking the boxes on the files individually.

Once you’ve selected files, you can download or export them in bulk.
Downloading will allow you to access all of the files directly. Simply click “Download .zip” to download the selected files.
Exporting creates a PDF report that contains each of your files along with data about them. Photos will appear directly on the PDF report, while videos will appear as an image with a link to download the full video. To export, click “Export” and then enter the email of the person who should receive the report. Once you click “Generate,” you’ll also have the option to copy a shareable link.
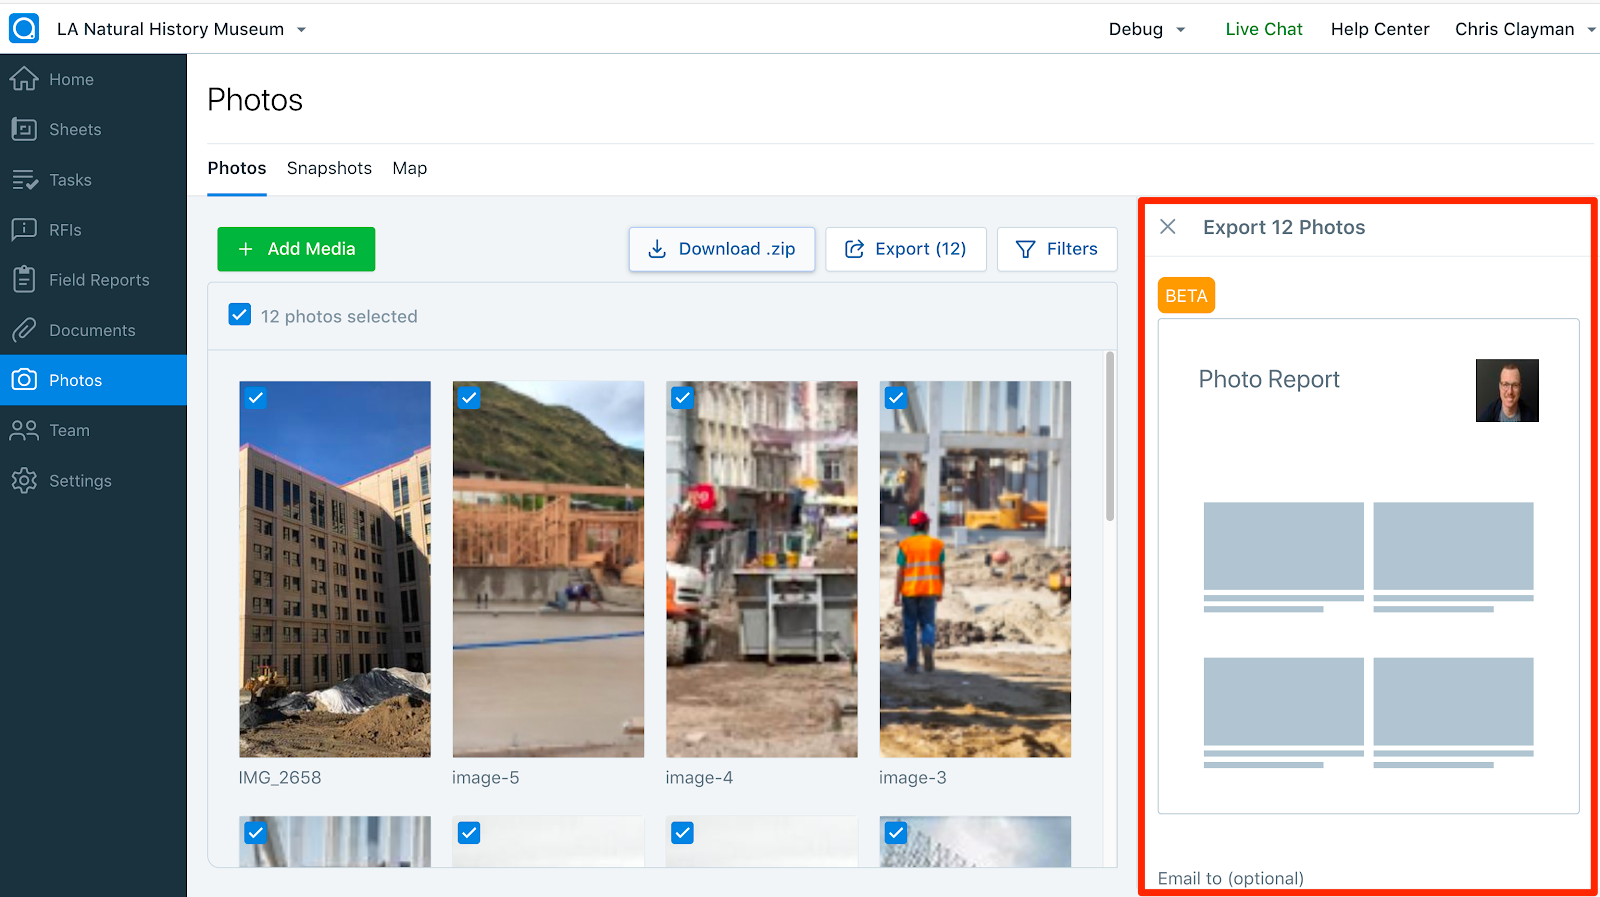
On iOS you can view and markup photos, view videos, see details about them, see their location on a map, and delete them from the device.
Navigate to the Photos section of the app to view your photos and videos. To view a photo or video, simply tap on it, and tap “Details” to view additional information, including the title, creation data, and location.

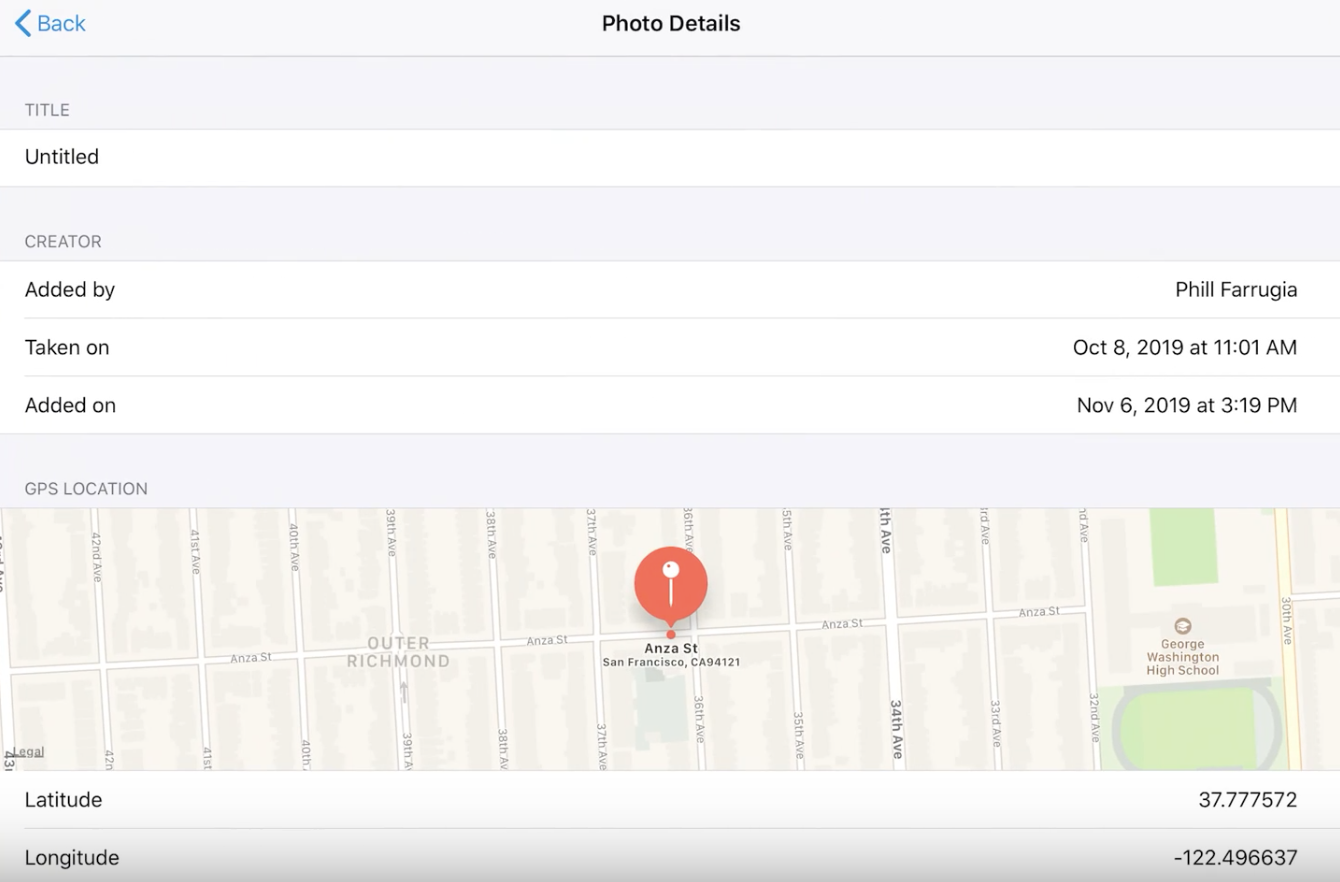
You can also view a map of all of your photos and videos by clicking on the map icon.

Marking up Photos:
Access any photo by the Sheet View or the Photo Gallery. From there, you will see the 'Markup' icon at the bottom center of the screen. You can then choose a color and mark the photo.

Deleting photos and videos from your device is simple:
- Open the file you’d like to delete
- Tap the delete icon
- Confirm the action.
This will delete the photo or video from your device, but they’ll still be viewable in the project on the PlanGrid website. Only one photo or video at a time can be deleted on mobile; there is not an option to delete in bulk/more than one at a time.
On Android, you can view photos and videos and see details about them, including their creation location on a map. You can also send a report about your photos and videos.
Navigate to the Photos section of PlanGrid. From here you can tap on each photo or video to view it and see details about it.
To select multiple photos or videos, long tap on one and then tap the circle on the upper-left hand corner of each.
To export a report about your photos and videos, select the ones you’d like to include and tap the “Share” icon. This will open a new email that will include a link to download the report. Reports contain each of your files along with data about them. Photos will appear directly on the PDF report, while videos will appear as an image with a link to download the full video.
On Windows, you can view photos and videos and see details about them. For photos, you can see where they were taken and whether they are associated with a sheet. You can also markup, rotate, download, or delete the file.
To download, markup, rotate, or delete a file, double click on it. Then select the corresponding action on the top of the screen.
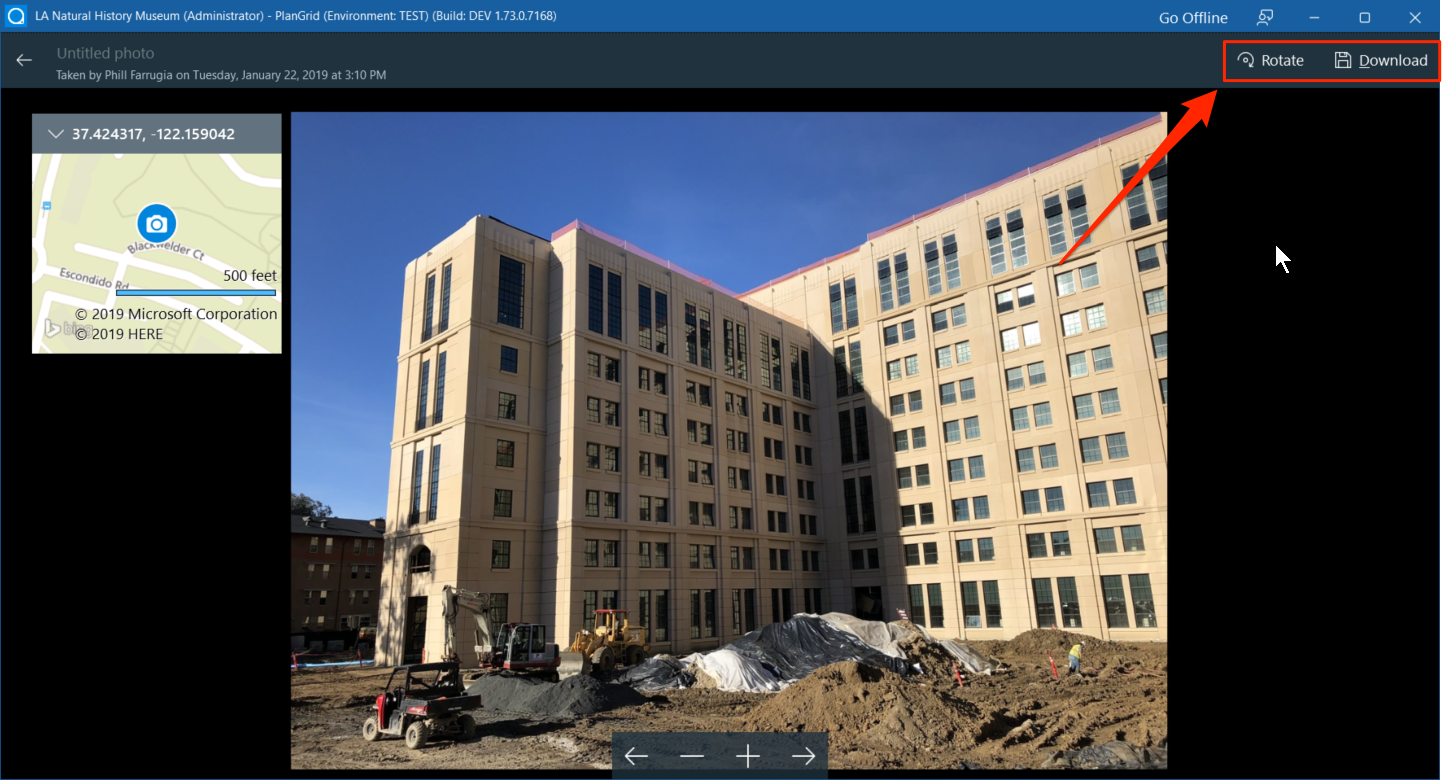
When you delete a photo or video from your device, it will still be viewable in the project on the PlanGrid website.
To download multiple files or export a report, select one or more files using the checkbox on the upper-left hand corner of the thumbnail image. Then click “Export.”
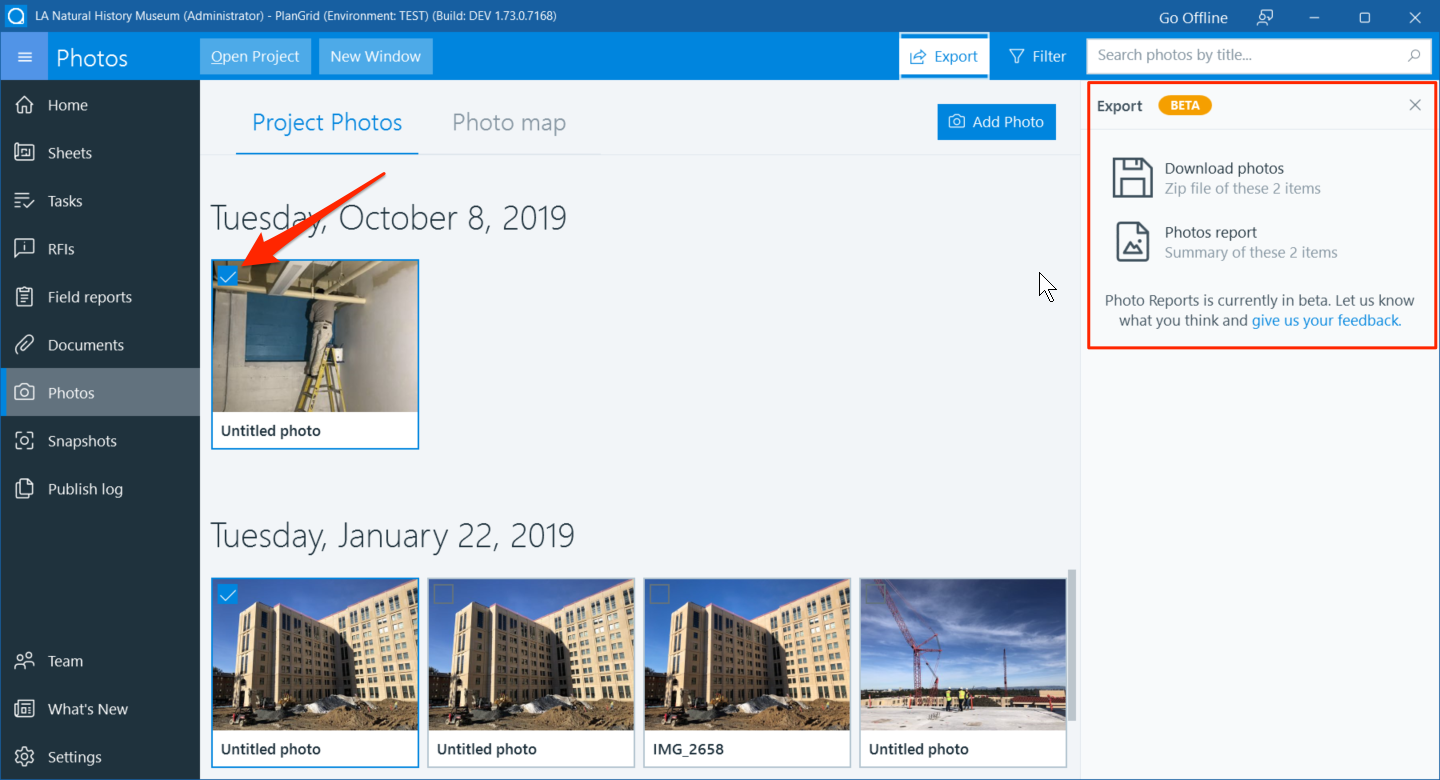
You can choose to download the selected files as a ZIP package or create a report. Simply click “Download photos” to download the files directly.
To generate a report, click “Photos report.” This will generate a shareable link that you can copy and email, or you can download the report directly. Photos will appear directly on the PDF report, while videos will appear as an image with a link to download the full video.
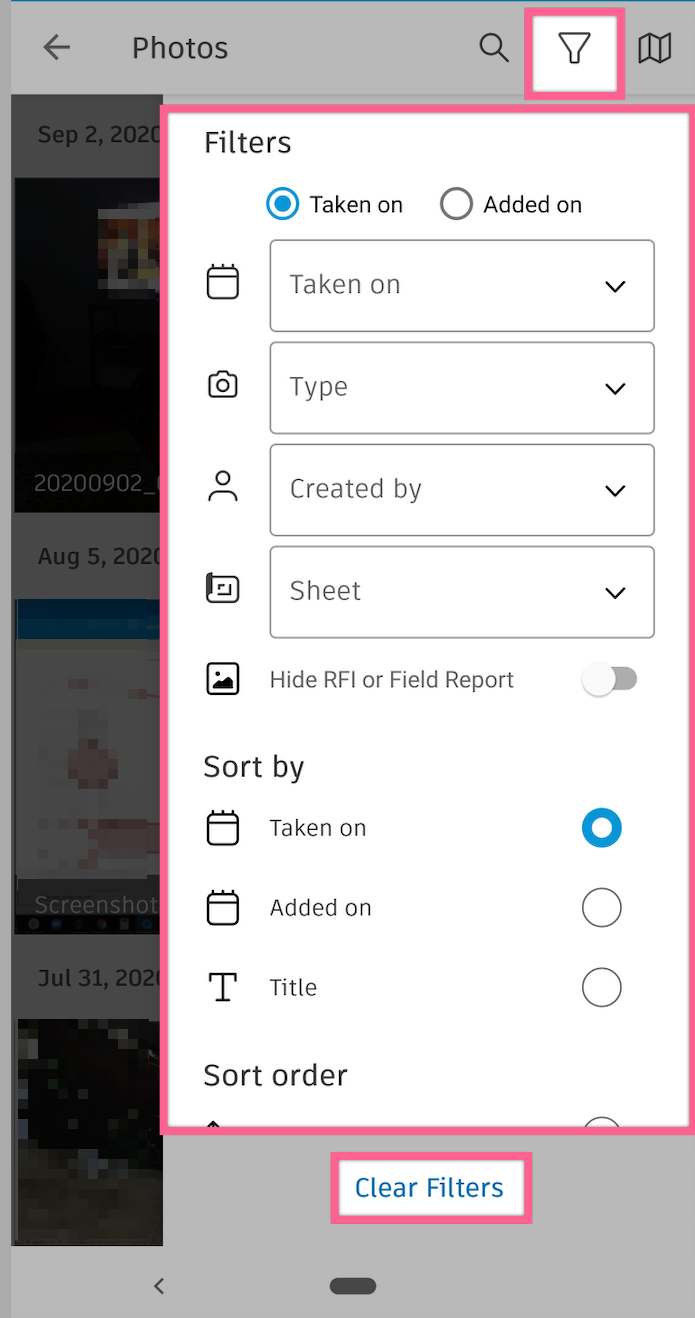
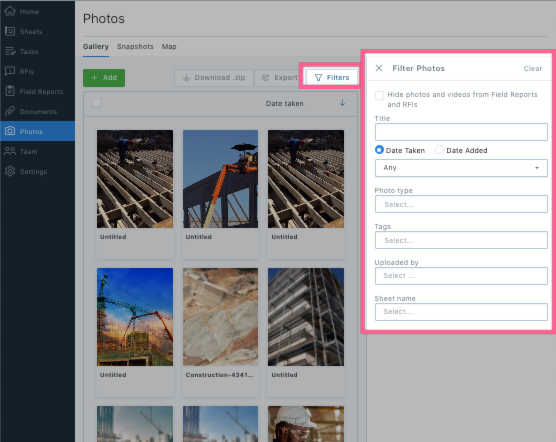
Use filters to quickly find the photos and videos you need to reference. You can filter in a number of ways:
- By photo or video title
- By photo or video creation date (or a date range)—note, this is the date the photo or video was originally taken, not its upload date
- By the person who uploaded the photo or video
- By sheet associated with the photo or video
- By tag
To filter photos and videos on the web, click the “Filters” button.
Enter the filter criteria you’d like to use, and your Photos page will automatically display files that match your filters. You can use multiple filters together at once.
To clear filters, simply click “Clear.”
To filter photos and videos on Windows, navigate to the Photos tab and click the “Filter” button.
Enter the filter criteria you’d like to use, and your Photos page will automatically display files that match your filters. You can use multiple filters together at once.
To clear filters, simply click “Clear.”

On iOS/Android
To filter photos and videos on iOS or Android, navigate to the Photos tab and click the “Filter” icon.
Enter the filter criteria you’d like to use, and your Photos page will automatically display files that match your filters. You can use multiple filters together at once.
To clear filters, simply click “Clear.”

