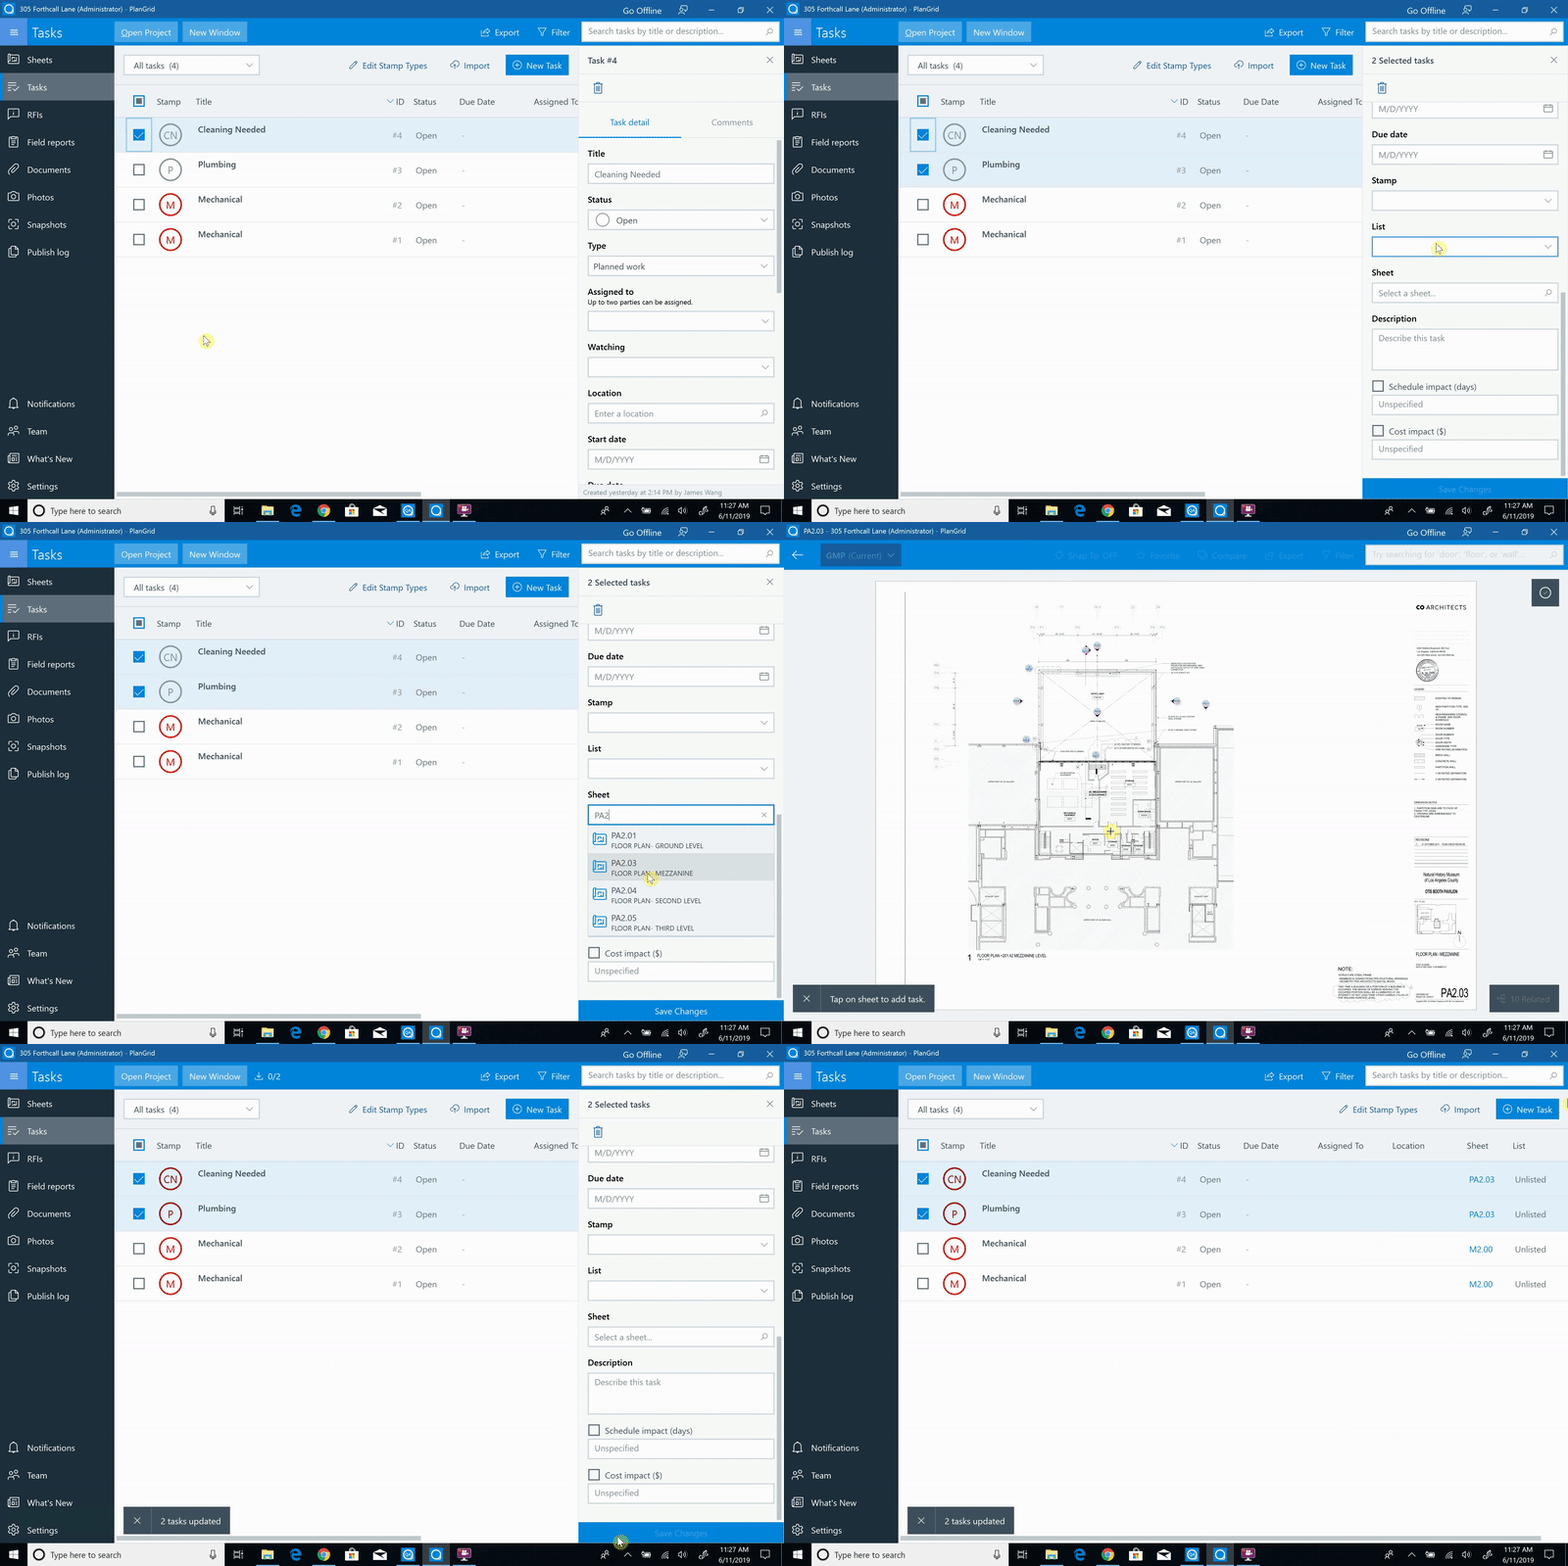
As an Admin or Power Collaborator, you can add or remove Tasks from sheets, or batch edit Tasks to manage their sheet and stamp placements.
This can be helpful if you wish to create Tasks in the Task Log or via Bulk Import, and then add them to sheets later, or if you wish to move a Task from one sheet to another.
Please use the following links to navigate to your action and platform of choice.
Adding a Task to a Sheet
• Web
• Android
• iOS
• Windows
Removing a Task from a Sheet
• Web
• Android
• iOS
• Windows
Moving a Task between Sheets
• Web
• Windows
Batch Editing Tasks
• Android
• iOS
• Windows
Adding a task to a sheet
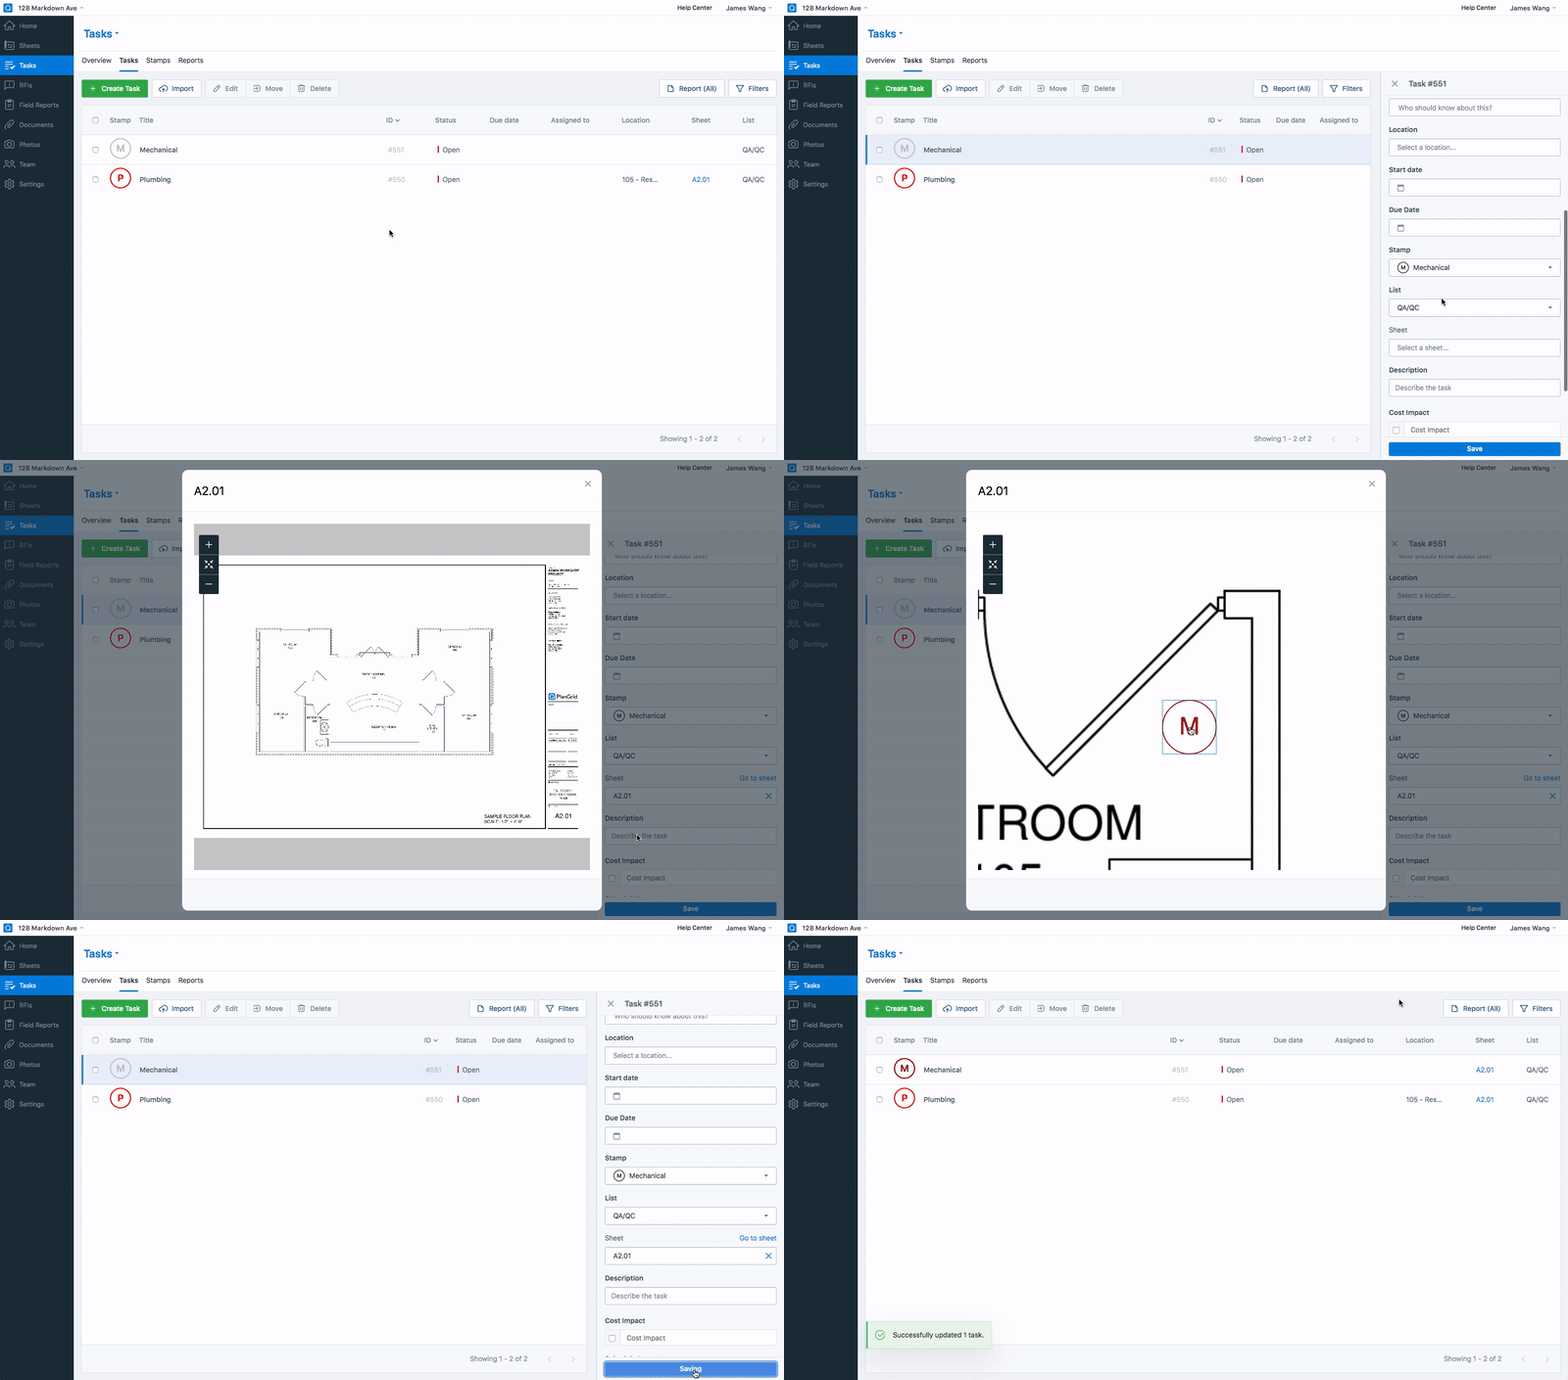
For Tasks in the Task Log without a sheet, you can open the “Sheet” field in the Task details to select a sheet and then place the Task stamp on the sheet.
Placing a previously sheetless Task onto a sheet will automatically publish the Task stamp.
1. In the Task Log, select the Sheetless Task you wish to add to a sheet, to open the Task detail.
2. From the Task detail, navigate to the “Sheet” field and select it to open your list of sheets in the project.
3. The sheet you wish to add the Task to. You can search the list to find your sheet more quickly.
4. Once the sheet viewer opens, click on the sheet to place the Task stamp.
5. From this view, you can drag the Task stamp around the sheet to refine its position.
6. Close the sheet viewer once you are satisfied with the Task stamp position.
7. Click “save” in the Task detail to save the Task to the sheet and any other changes you’ve made
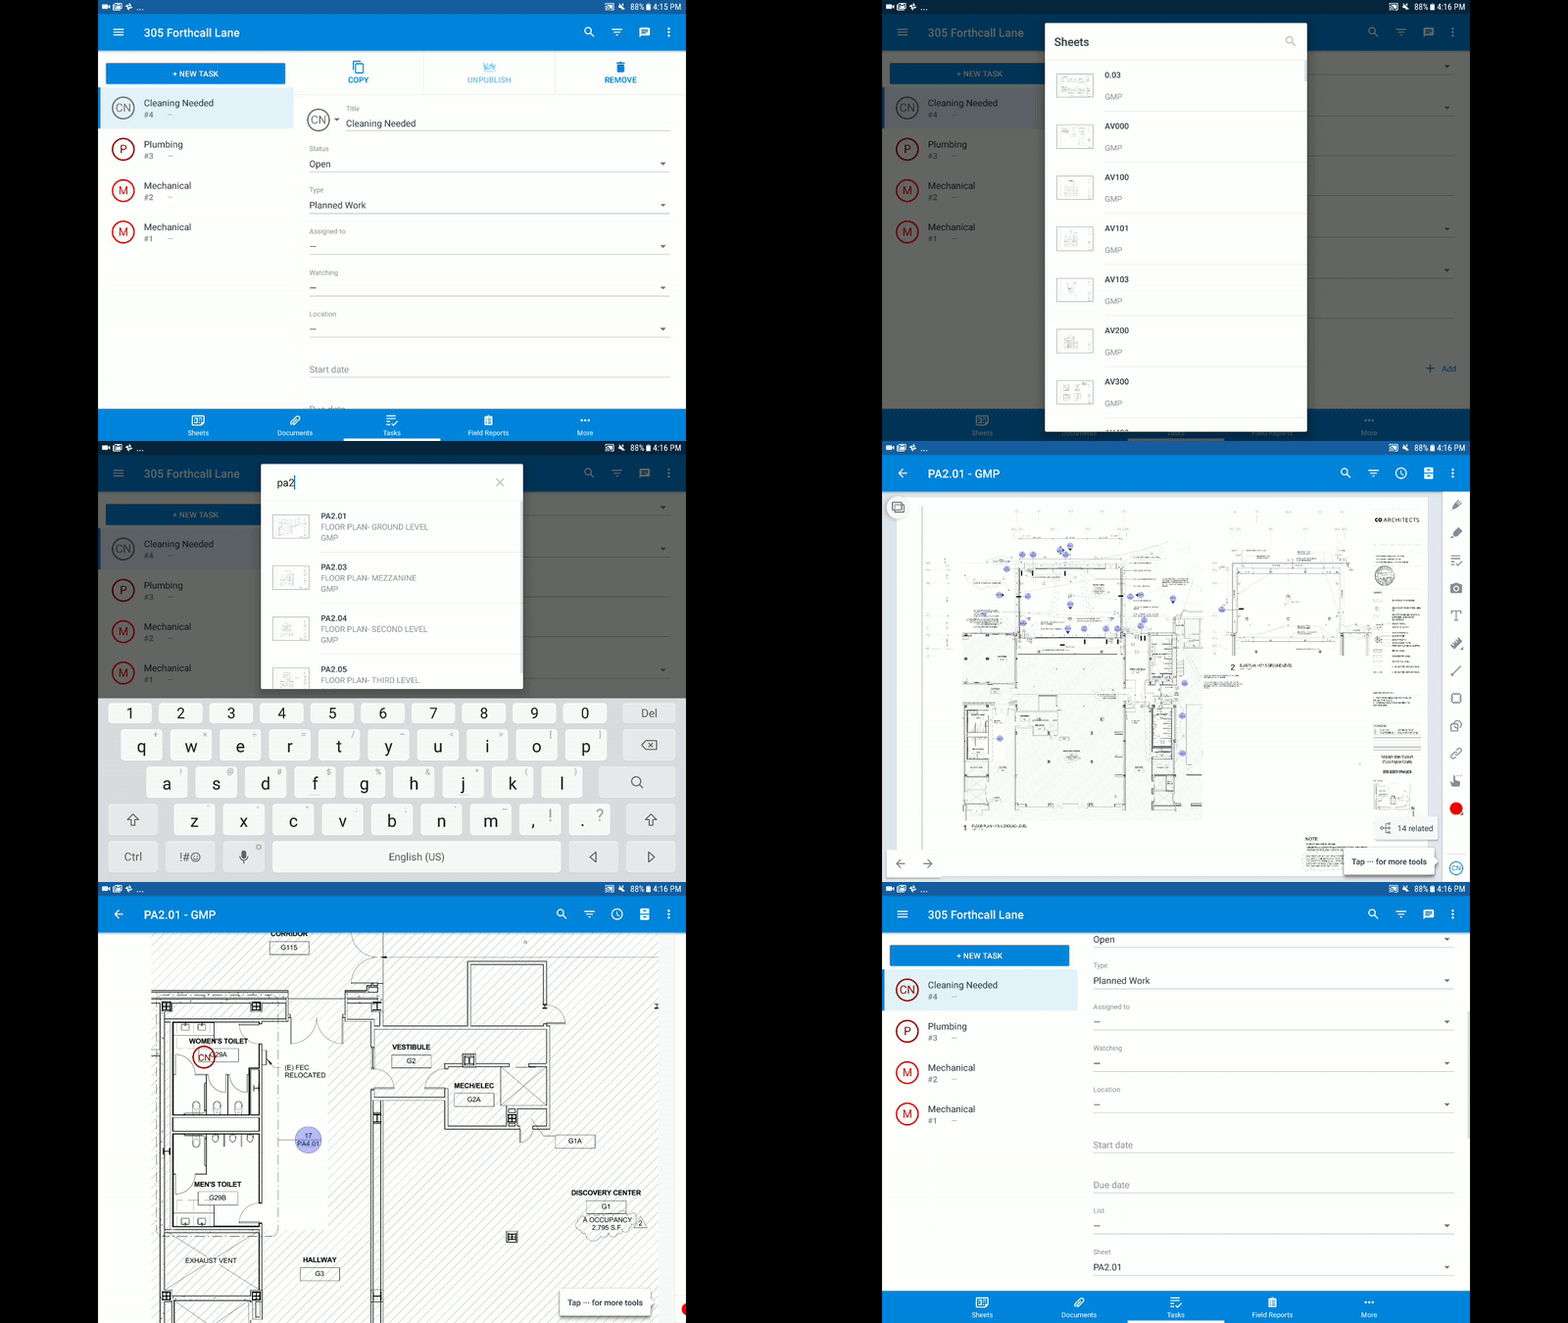
1. In the Task Log, select the Sheetless Task you wish to add to a sheet, to open the Task detail.
2. From the Task detail, navigate to the “Sheet” field and select it to open your list of sheets in the project.
3. Select the sheet you wish to add the Task to. You can search the list to find your sheet more quickly.
4. Once the sheet opens, tap on the sheet to place the Task stamp.
5. From this view, you can drag the Task stamp around the sheet to refine its position.
6. Select “Done” when you’ve finished.
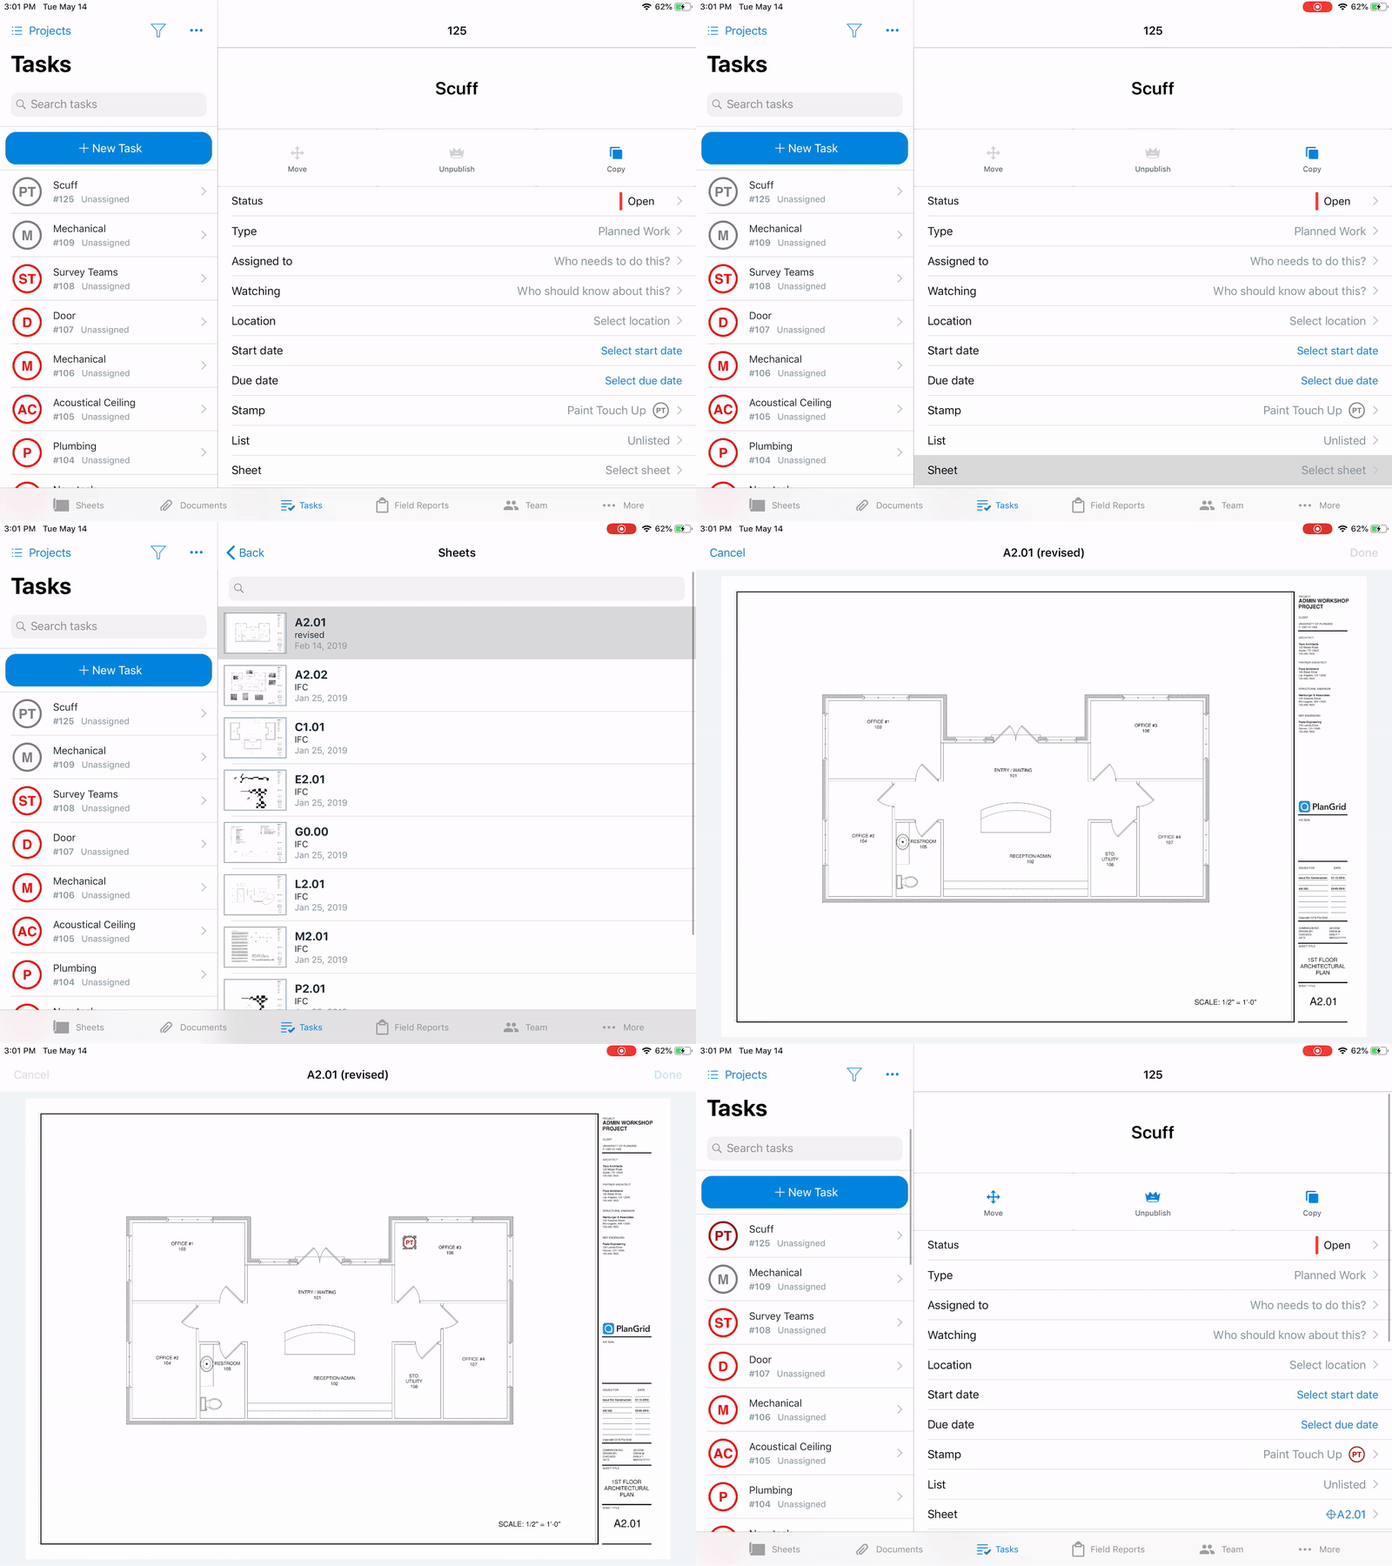
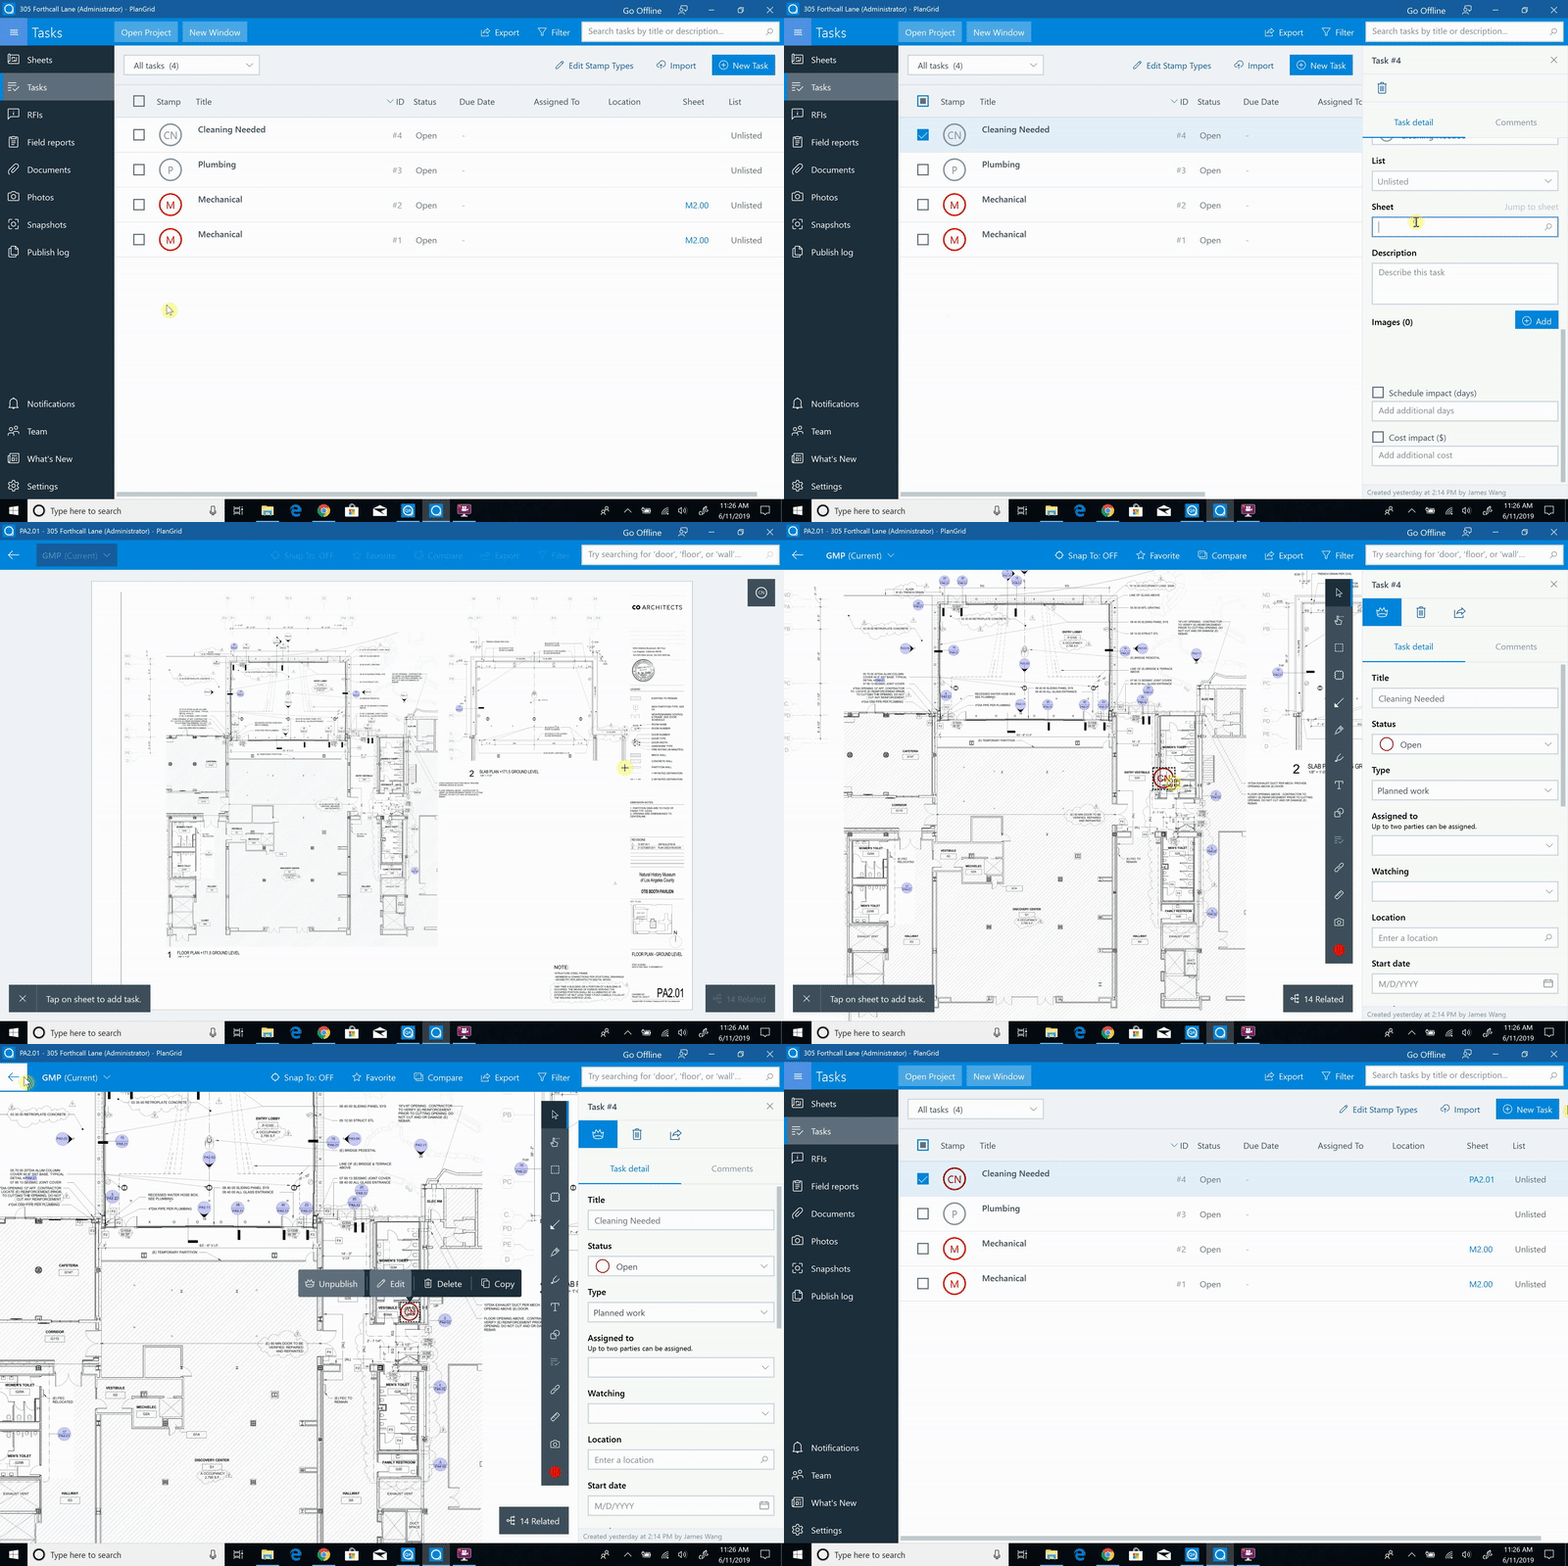
1. In the Task Log, select the Sheetless Task you wish to add to a sheet, to open the Task detail.
2. From the Task detail, navigate to the “Sheet” field and select it to open your list of sheets in the project.
3. Select the sheet you wish to add the Task to. You can search the list to find your sheet more quickly.
4. Once the sheet viewer opens, click on the sheet to place the Task stamp.
5. From this view, you can drag the Task stamp around the sheet to refine its position.
6. Close the sheet viewer once you are satisfied with the Task stamp position.
Removing a Task from a sheet
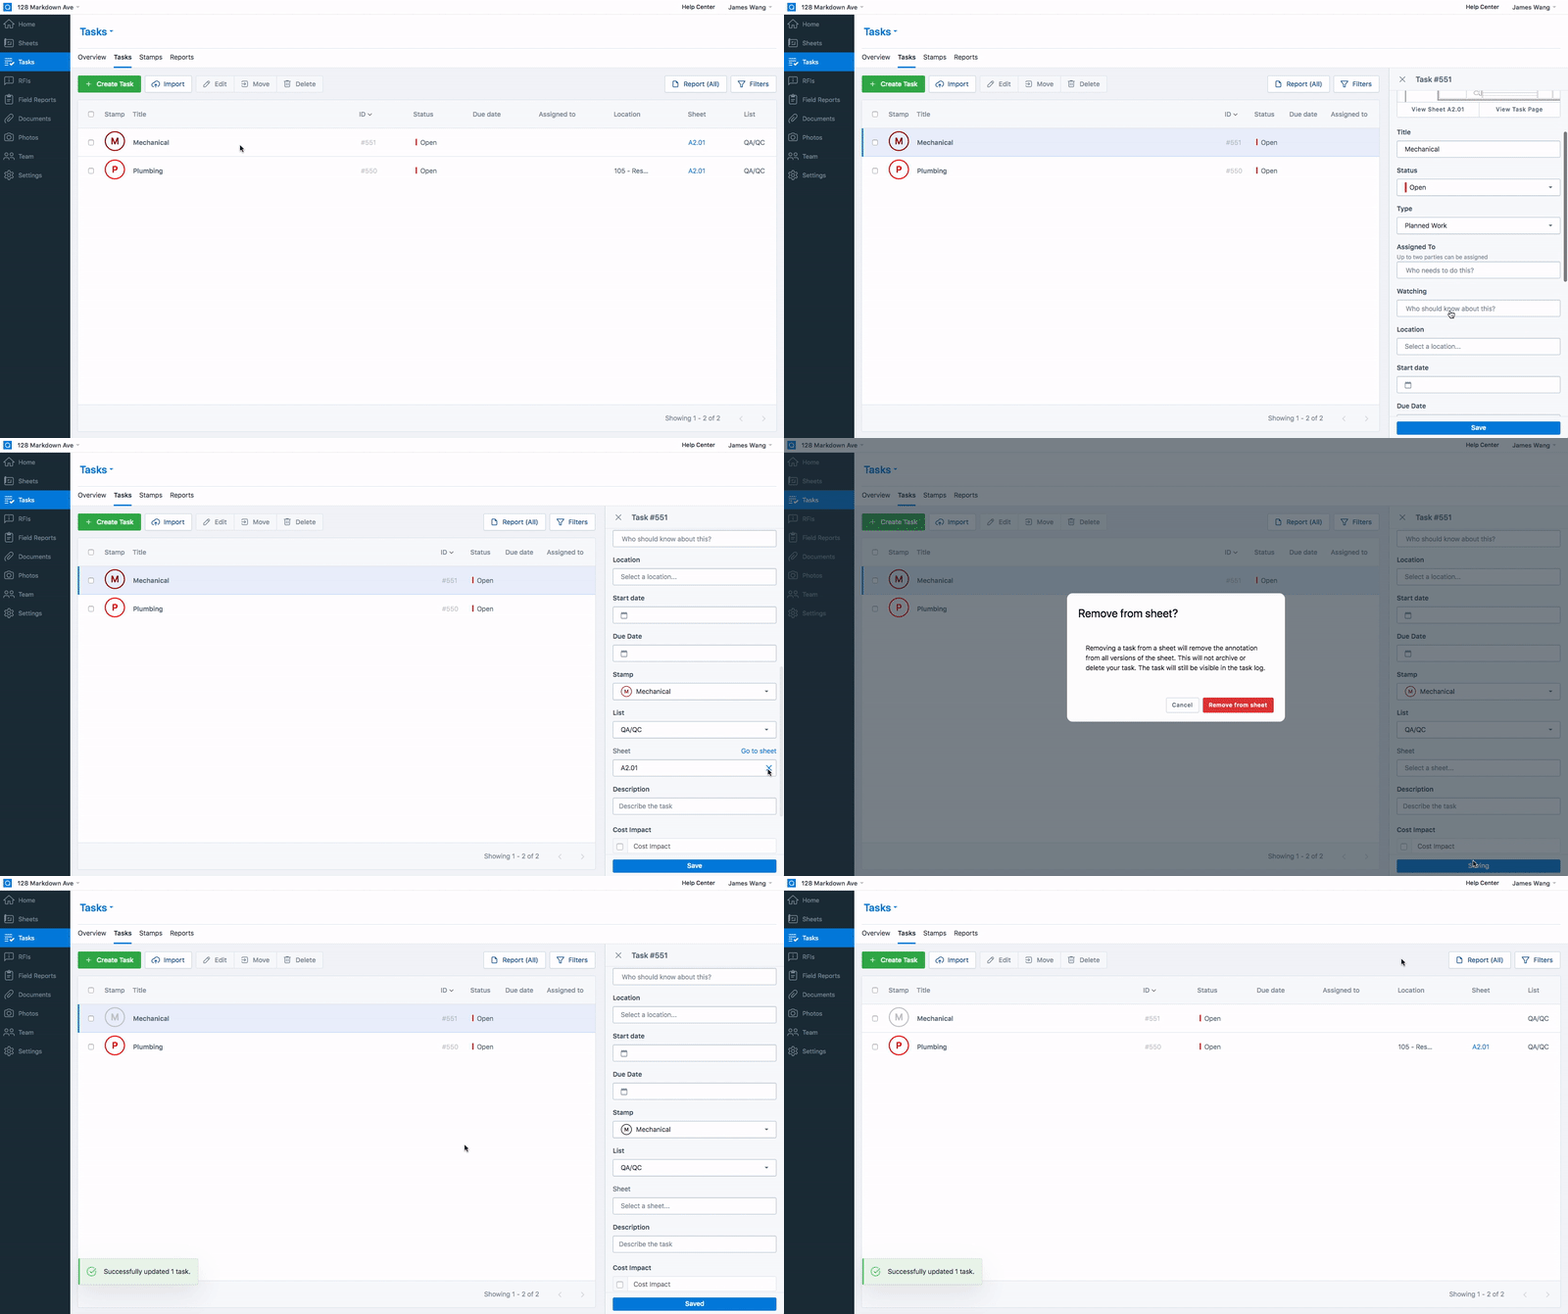
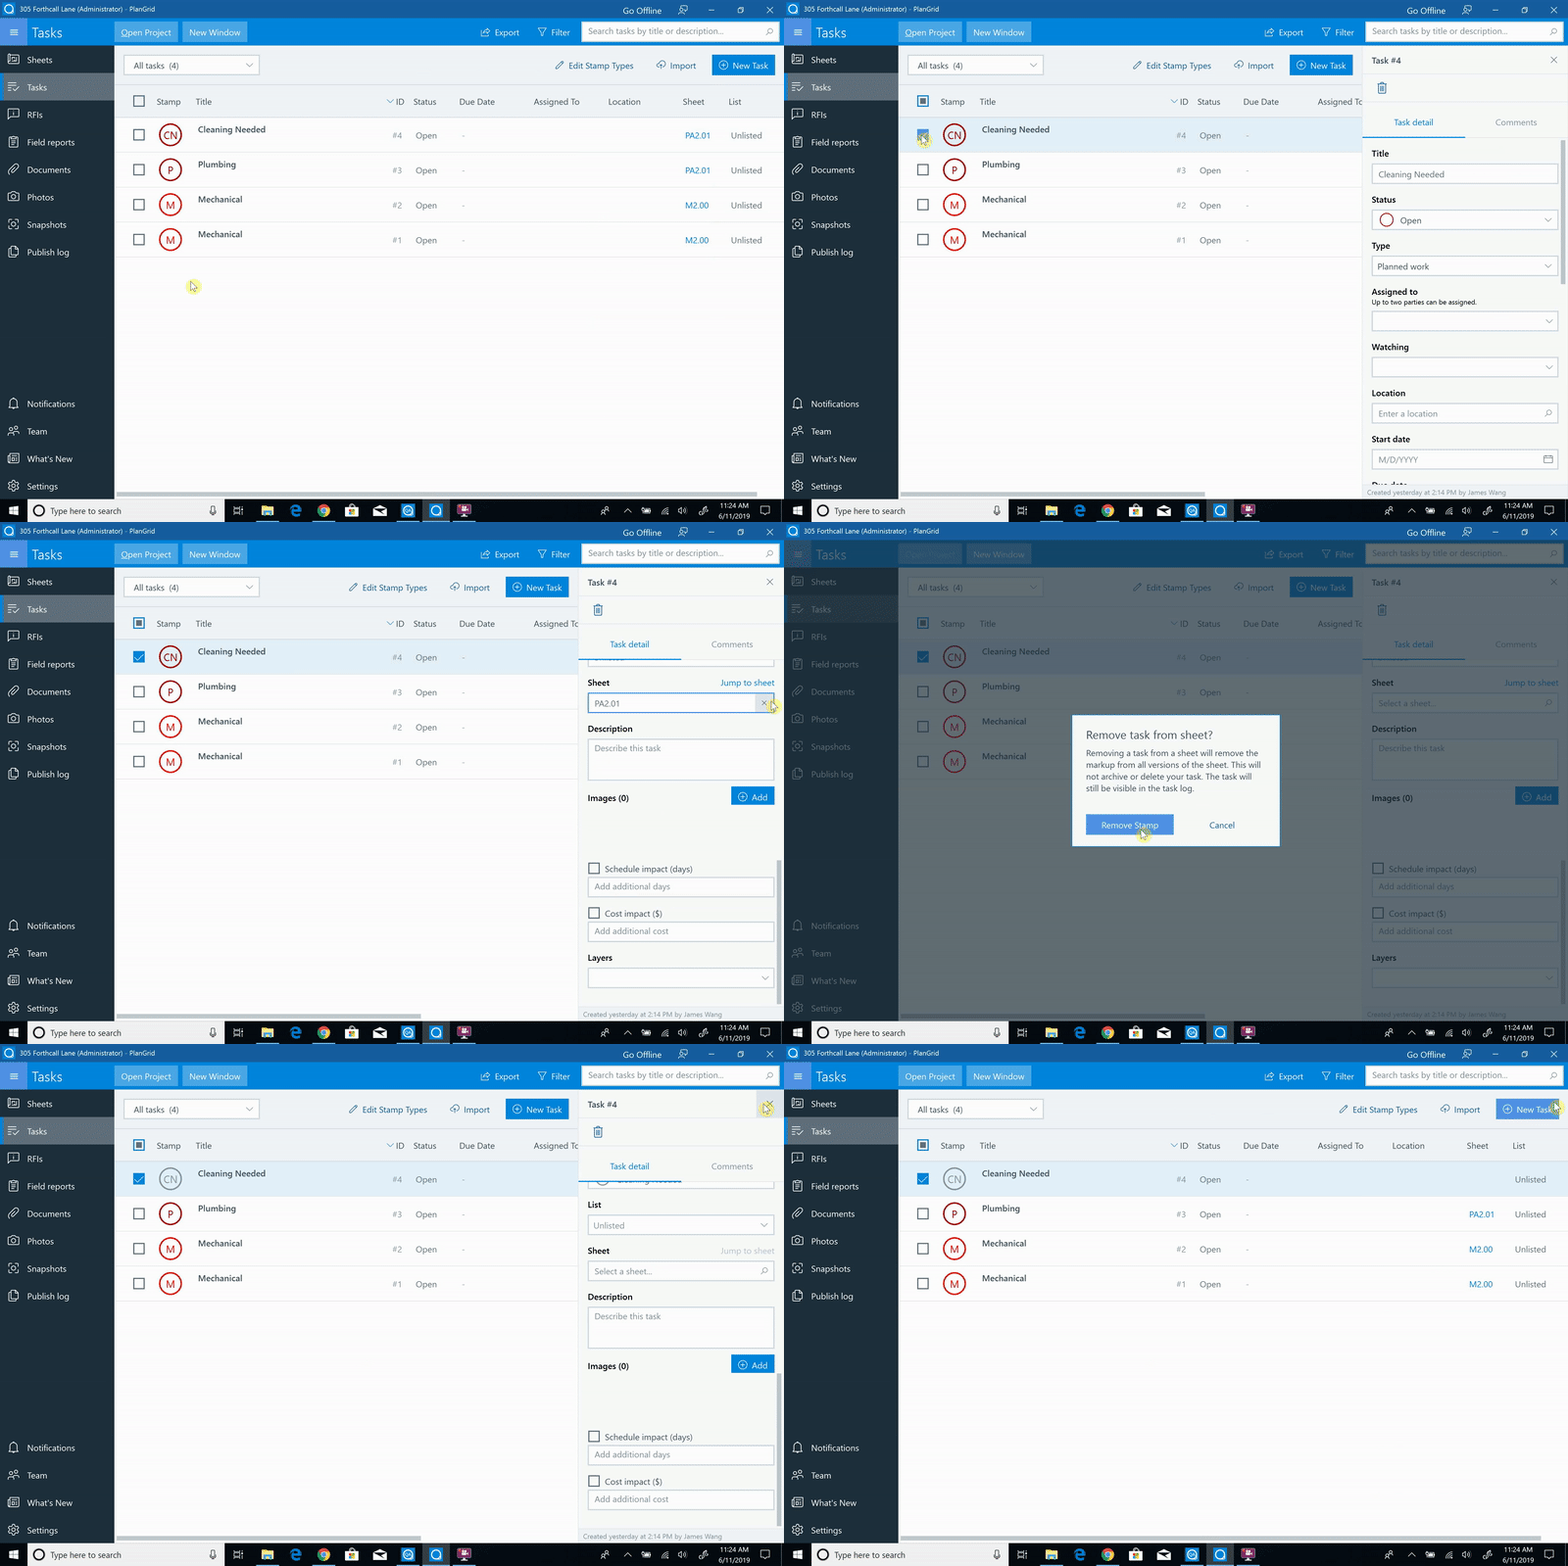
When a Task is already placed on a sheet, users can select the “Sheet” field to choose to remove the Task from its sheet.
This will convert the Task to a Sheetless Task, which will be visible to all users in your project in the Task Log.
1. From the Task Log or the sheet, select the Task which you wish to remove from its sheet, to open the Task detail.
2. From the Task detail, navigate to the “Sheet” field and click the “X” button.
3. Click the save button to save the sheet removal and any other edits you may have made.
4. You will be prompted to confirm whether you wish to remove the Task from the sheet.
5. Confirm removal of the Task from the sheet to complete the action.
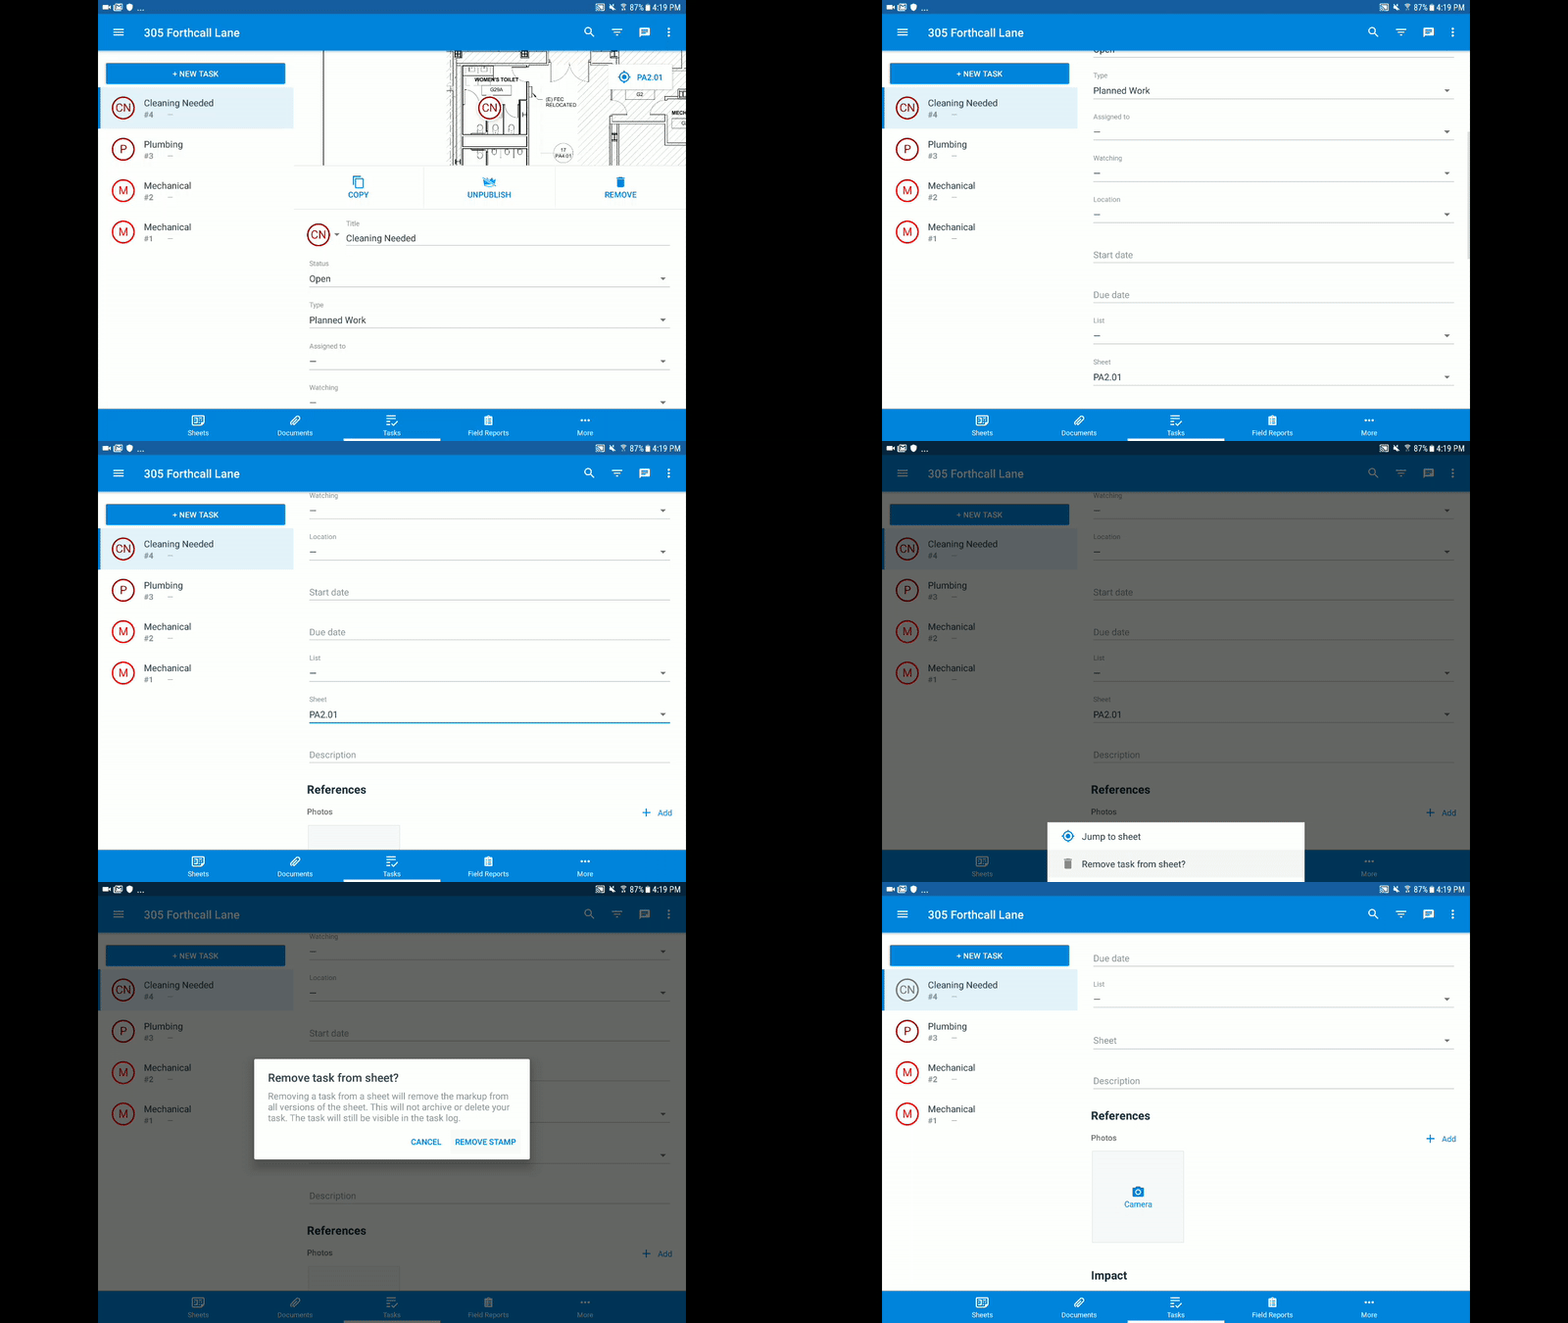
1. From the Task Log or the sheet, select the Task which you wish to remove from its sheet, to open the Task detail.
2. From the Task detail, navigate to the “Sheet” field and tap the field to open a menu.
3. Select “Remove Task from sheet”.
4. You will be prompted to confirm whether you wish to remove the Task from the sheet.
5. Confirm removal of the Task from the sheet to complete the action.
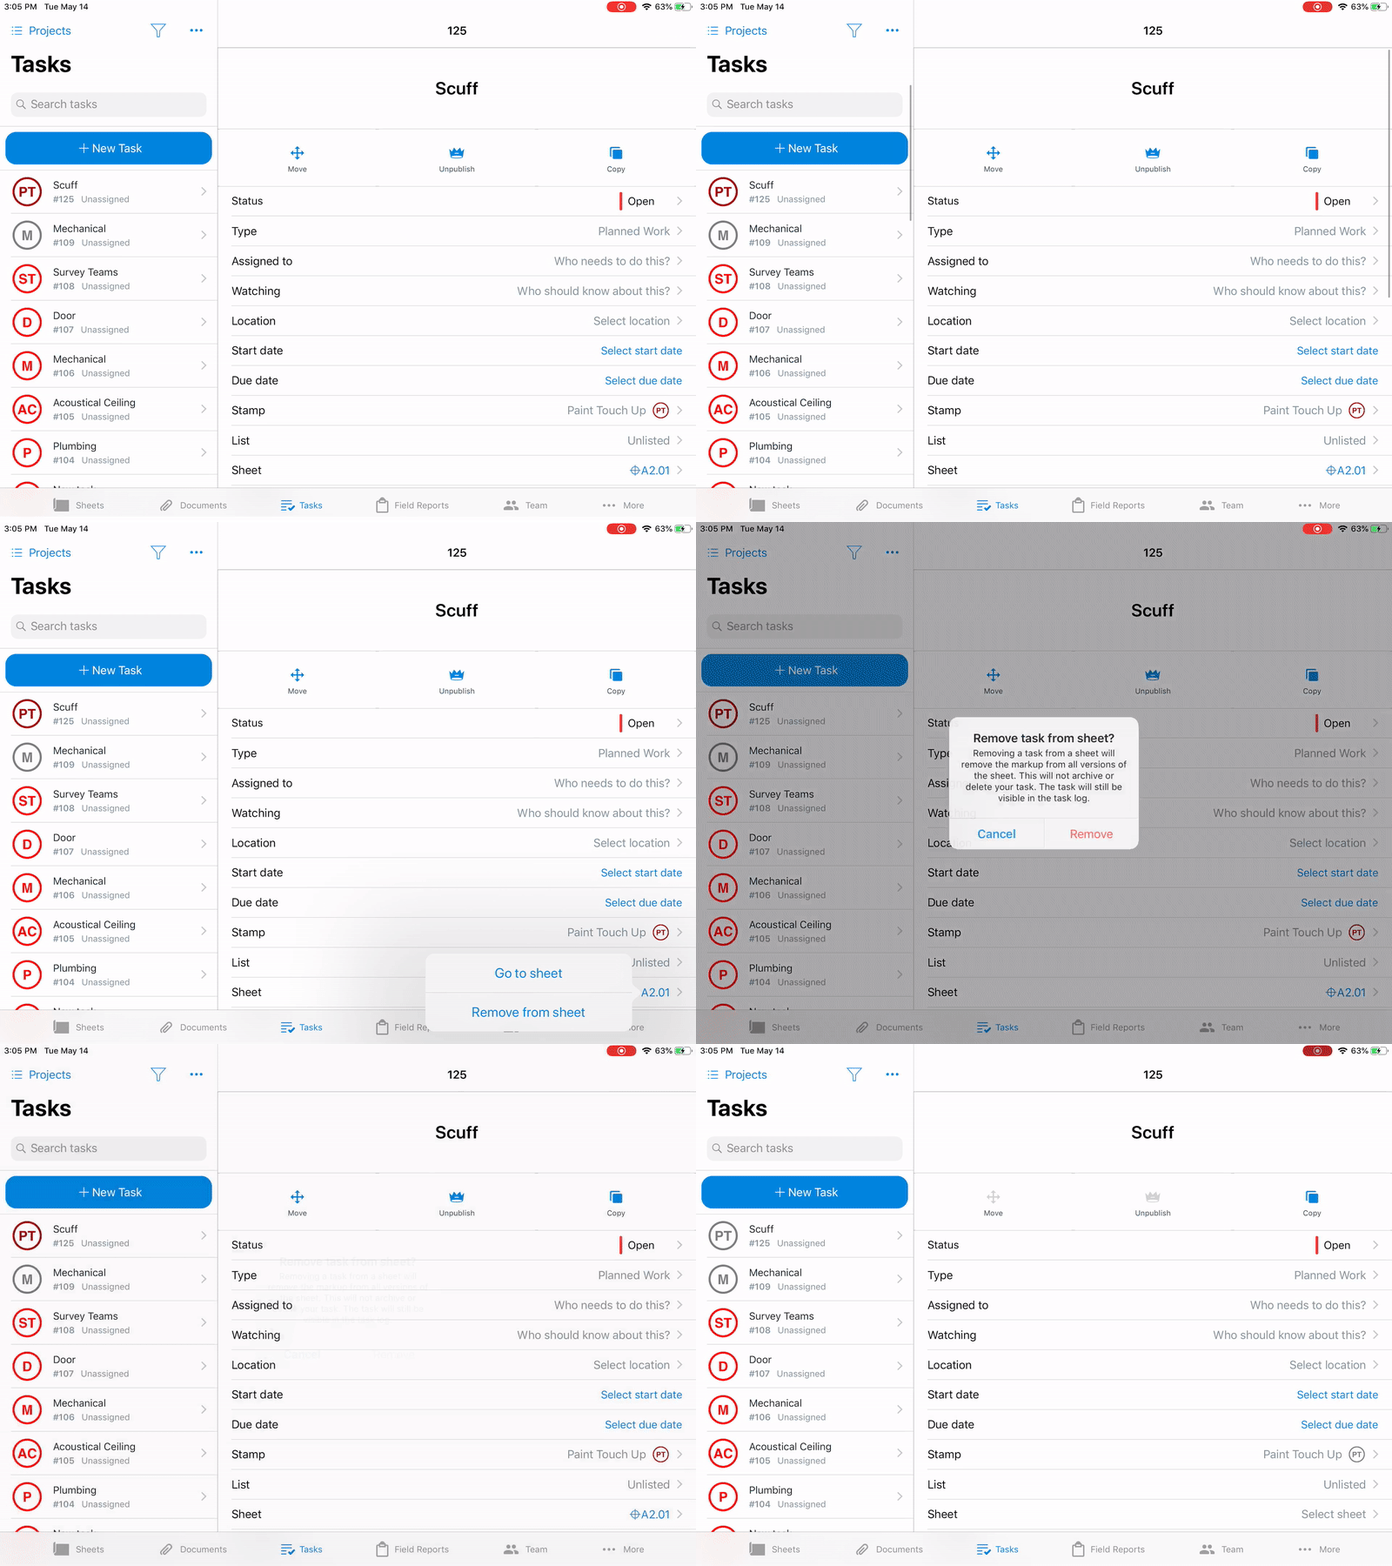
1. From the Task Log, select the Task which you wish to remove from its sheet, to open the Task detail.
2. From the Task detail, navigate to the “Sheet” field and tap the field to open a menu.
3. Select “Remove from sheet”.
4. You will be prompted to confirm whether you wish to remove the Task from the sheet.
5. Confirm removal of the Task from the sheet to complete the action.
1. From the Task Log or the sheet, select the Task which you wish to remove from its sheet, to open the Task detail.
2. From the Task detail, navigate to the “Sheet” field and click the “X” button.
3. You will be prompted to confirm whether you wish to remove the Task from the sheet.
4. Confirm removal of the Task from the sheet to complete the action.
Moving a Task between Sheets
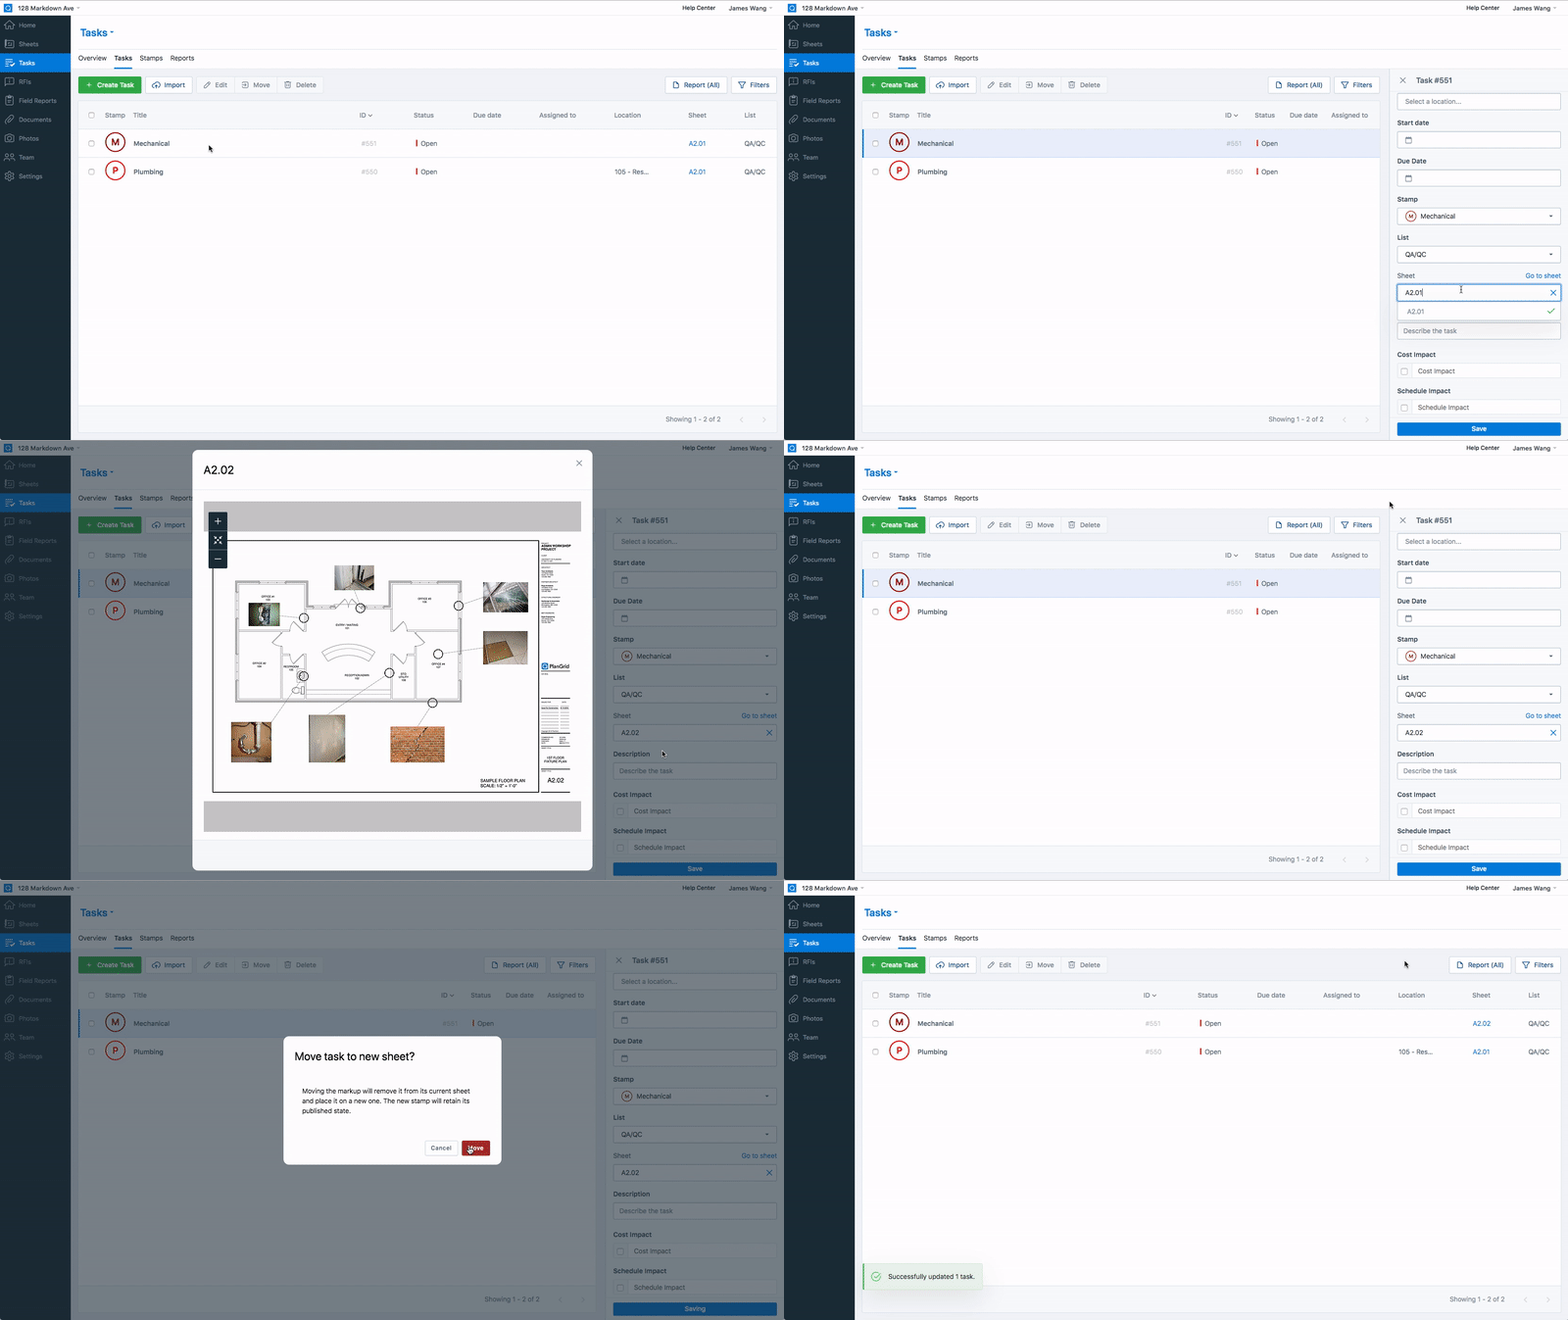
You can directly move a task from one sheet to another. Published Task Stamps will remain published when moved; unpublished Task Stamps will remain Unpublished. It is currently only available for Web and Windows.
1. From the Task Log, select the Task which you wish to move, to open the Task detail.
2. From the Task detail, navigate to the “Sheet” field and select it to find another sheet.
3. Select the sheet you wish to add the Task to. You can search the list to find your sheet more quickly.
4. Once the sheet viewer opens, click on the sheet to place the Task stamp.
5. You will be prompted to confirm moving the Task to a new sheet.
6. Confirm the move for the Task to commit the change to the Task.
7. From this view, you can drag the Task stamp around the sheet to refine its position.
8. Close the sheet viewer once you are satisfied with the Task stamp position.
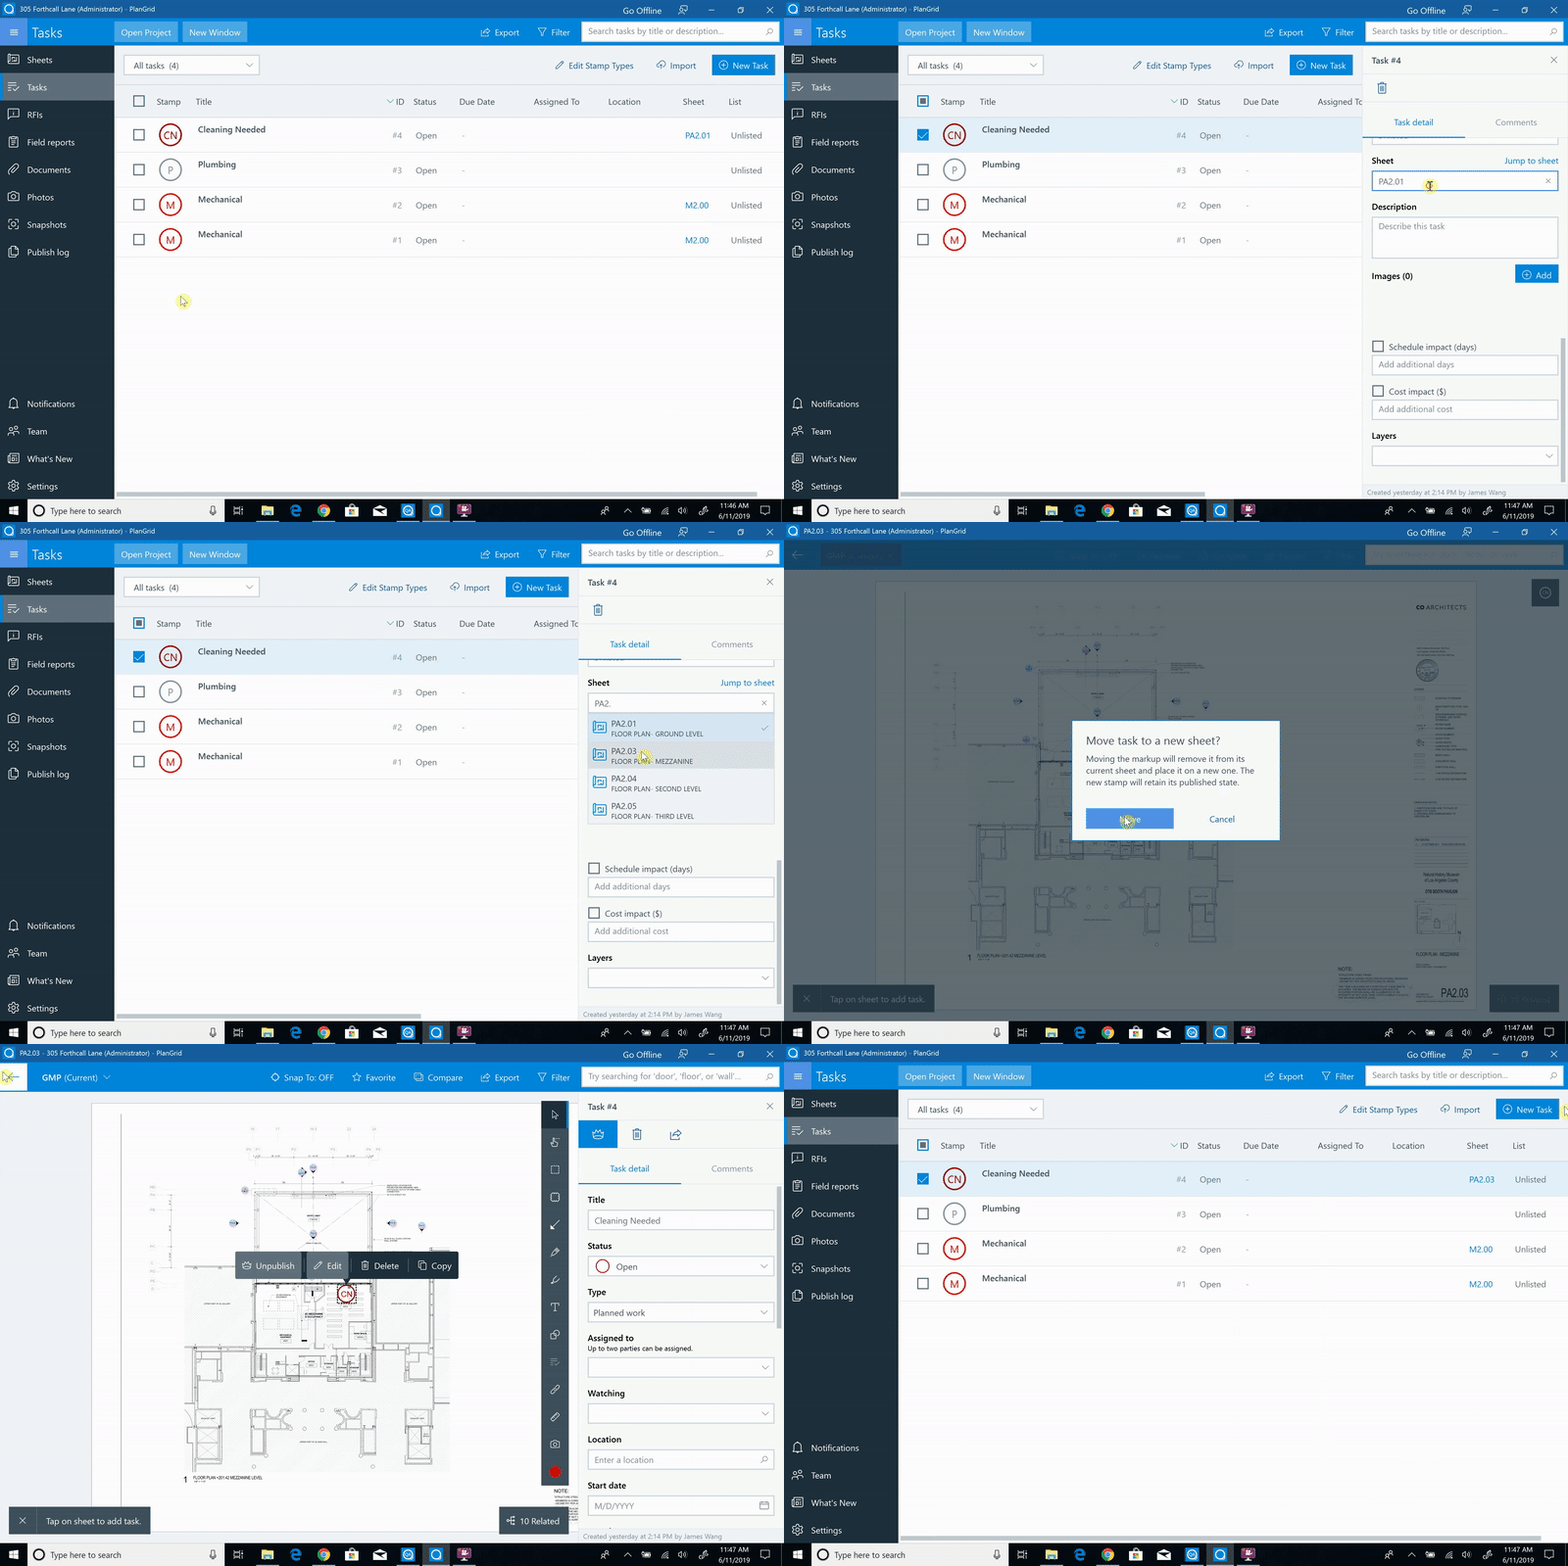
1. From the Task Log or the sheet, select the Task which you wish to move, to open the Task detail.
2. From the Task detail, navigate to the “Sheet” field and select it to find another sheet.
3. Select the sheet you wish to add the Task to. You can search the list to find your sheet more quickly.
4. Once the sheet viewer opens, click on the sheet to place the Task stamp.
5. You will be prompted to confirm moving the Task to a new sheet.
6. Confirm the move for the Task to commit the change to the Task.
7. From this view, you can drag the Task stamp around the sheet to refine its position.
8. Close the sheet viewer once you are satisfied with the Task stamp position.
Batch Editing Tasks
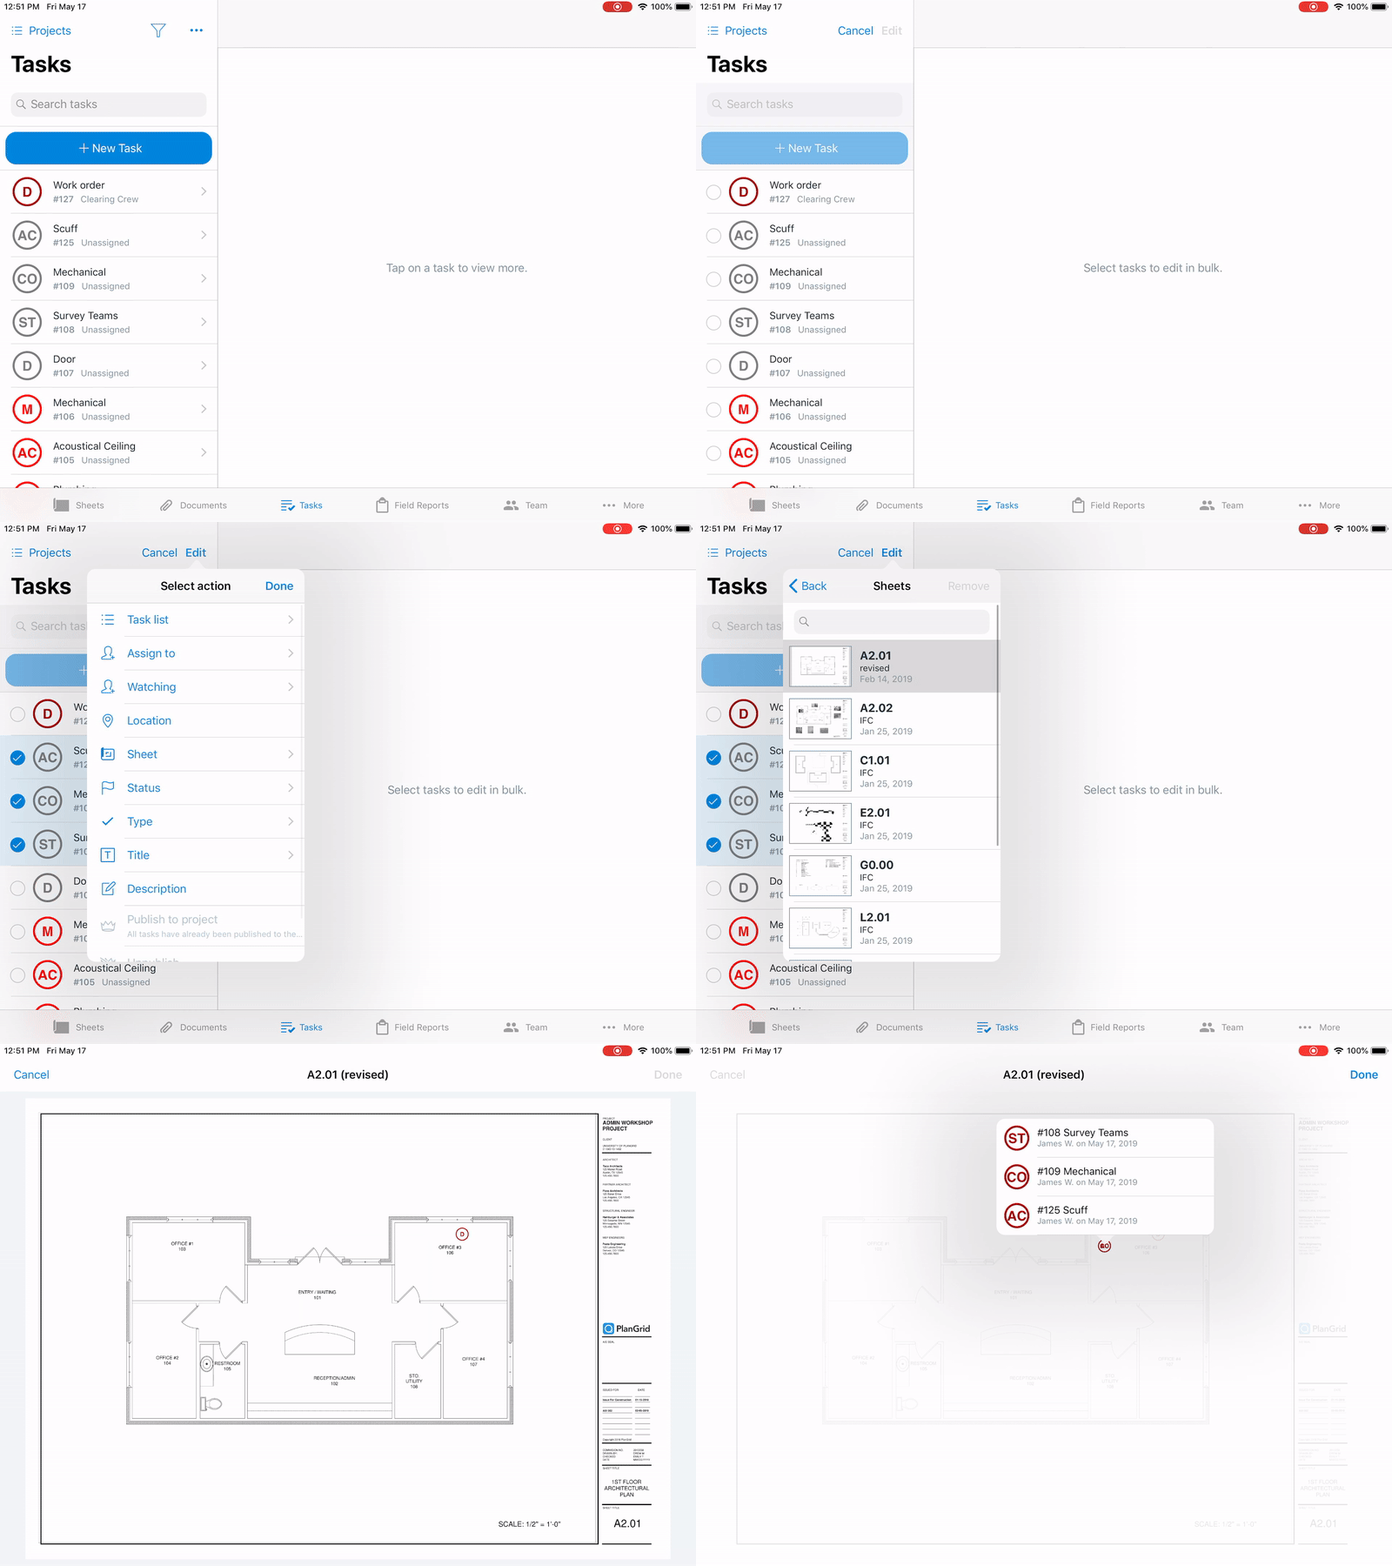
The Batch Edit menu will now include a “Sheet” field for managing multiple Tasks. From the Batch Edit menu, you will be able to add multiple Tasks to a Sheet, or remove multiple Tasks from their Sheets. This is currently available on Android, iOS, and Windows.
1. Select the overflow menu at the top of the task Log and tap “Select Tasks”
2. Select the Tasks which you wish to add to a new sheet.
3. Tap the “Edit” button to open the batch edit menu.
4. Select the “Sheet” option to view the list of sheets.
5. Select the sheet you wish to add the Tasks to. You can search the list to find your sheet more quickly.
6. Once the sheet viewer opens, click on the sheet to place the Task stamps.
7. Once you’ve placed the Task stamps, the changes will be saved automatically.
8. From this view, you can select among the Tasks and drag them to different positions.
9. Close the sheet viewer once you are satisfied.
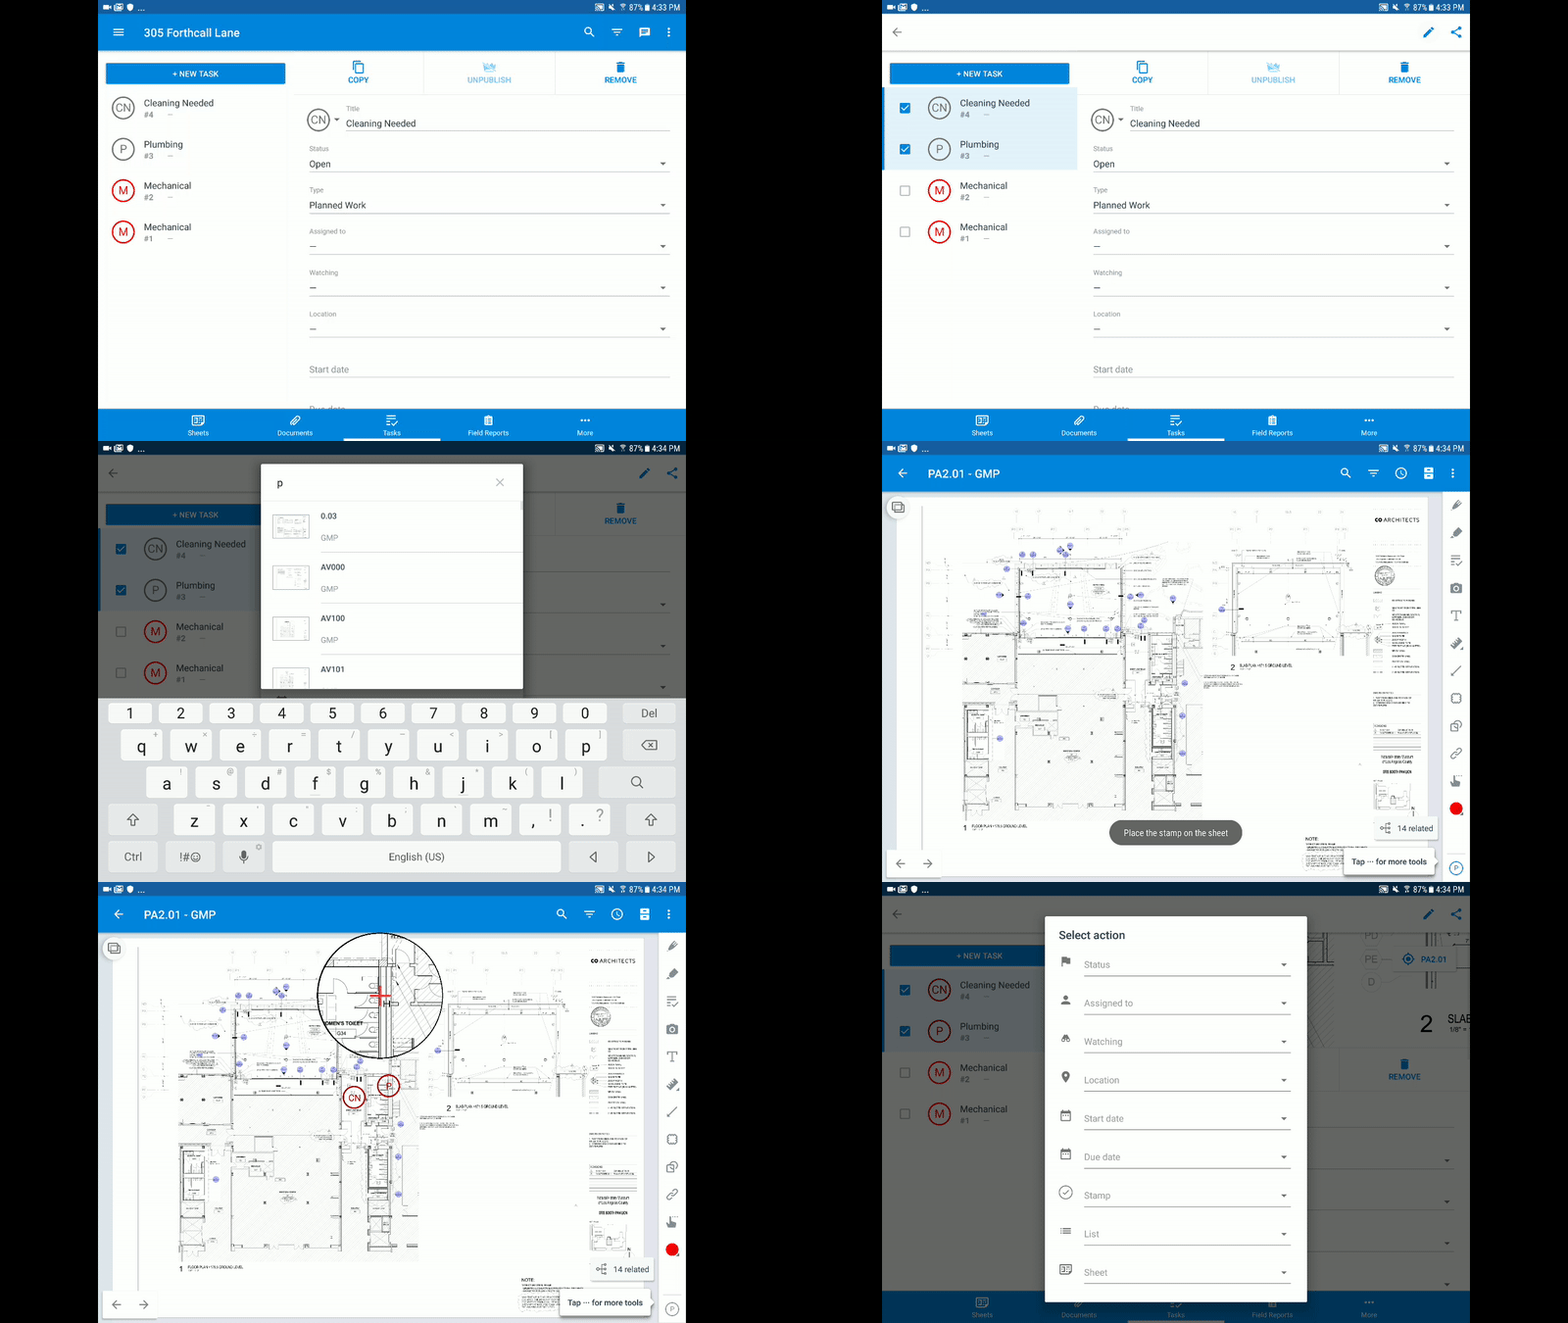
1. Select the overflow menu at the top of the Task Log and tap “Select Tasks”
2. Select the Tasks which you wish to add to a new sheet.
3. Tap the “Edit” button to open the batch edit menu.
4. Select the “Sheet” option to view the list of sheets.
5. Select the sheet you wish to add the Tasks to. You can search the list to find your sheet more quickly.
6. Once the sheet viewer opens, click on the sheet to place the Task stamps.
7. Once you’ve placed the Task stamps, the changes will be saved automatically.
8. From this view, you can select among the Tasks and drag them to different positions.
9. Close the sheet viewer once you are satisfied.
1. From the Task Log, select the Tasks which you wish to add to a new sheet, which will open the batch edit menu.
2. Select the “Sheet” option to view the list of sheets.
3. Select the sheet you wish to add the Tasks to. You can search the list to find your sheet more quickly.
4. Once the sheet viewer opens, click on the sheet to place the Task stamps.
5. Once you’ve placed the Task stamps, you will be brought back to the Task Log to save your changes.
6. Click “Save Changes” to commit any changes you’ve made to the selected Tasks.
7. You can navigate to the sheet to adjust the positions of the Tasks you’ve just placed.
